Synesthetic Landscape:
An Audio-Visual Moving Composite
22% of Semester Grade
Quick Links on this Page:
- Overview
- Concepts, Tools, and Techniques Covered
- Process
- Concept and Content Requirements
- Technical Requirements
- Due at the Critique
- Example Student Work
Overview
You will envision and create a composited 1-2 minute video interpretation of a landscape (abstract, emotional, physical, or other) that is inspired and evoked by instrumental music clips. The music clips will be provided by the instructor, but you will be able to make your own selection from those clip(s) provided with the link below in “Acceptable Music Clips.” This assignment will focus on the layering of sound, video, and still imagery to create a media-rich audio-visual composite using Photoshop.
The video’s visual components will be comprised of at least two video clips of the student’s choice. You can also add additional footage from other clips, as well as still imagery. The visual footage should tell a story or communicate to viewers an emotional impact. For ideas on approaches you can take to do this, read more in the Process section later in this project outline.
If you want to see a former Zoom recording that introduces this project, you can watch it below. You might want to speed this one up because I talk a little slowly in it.
Gathering Project Media Resources
Acceptable Music Clips (do not deviate from this list.)
You are restricted to using music clips from the playlists in the following link:
https://learn.leighcotnoir.com/2015/04/project-playlists/
NOTE: To view the link above, please refer to the Canvas “Announcements” to get the password, as the page is password-protected. ALL of these resources are available through Canvas directly, though.
“Why can’t I use my own music?”
The goals of restricting students to using specific, preselected music are as follows:
- to encourage creative and critical thought based on potentially non-familiar resources
- introduce students to the types of content restrictions that will be common in many future creative jobs
- to get students to “think outside the box”
“Why can’t I use music with words?”
This assignment is intended to push students into a less literal and more conceptual mode of creativity. To help avoid the mechanical pitfalls of making a literal translation from verbal to visual communication, songs with words are not permitted. Not only can it be more challenging to have less literal boundaries, but it can also be more liberating in the scope of possibilities.
Video Clip Resources
In a previous exercise, we used simple keyframing to animate the creation process of your second exercise assignment. That animation only explored tweening of still image layers. In this project, however, you will be required to use actual video footage from at least two separate resources and manipulate the footage in such a way that it communicates a new and unique meaning.
Where do I get video footage?
You can use the following resources:
- Original video that you shoot from a digital device that can easily share video via email, cloud storage, or download via syncing cable to your computer. You can also check out hand-held cameras from the school onsite, but you need to buy your own SD video card to record and store footage. Many smart phones take great video and have simple sharing options built into their interfaces.
- Public Domain, or Creative Commons video footage available: Visit the Free Media Resources page for information regarding:
- copyrights, royalties, & media licensing,
- where and how to get quality free images, videos, and audio.
- You can also request permission to use people’s work. It’s surprising how easy it can be to get permission to reuse someone’s work as long as you explain that it is for educational use only and that you will give the author credit.
- You can use copyrighted material for educational use only. The use of copyrighted sources is not encouraged for this assignment. Using copyrighted materials as part of your assignment will prohibit you from using it for commercial uses. There are still restrictions about how much of someone’s copyrighted work you can use even for education. Read the Fair Use Guidelines for details.
“How do I download video from Youtube, Vimeo, or other video websites?”
- First, check to see if the video has a simple download link! That is by far the easiest solution.
2. If no video download link is available, make sure that the rights allow you to reuse the video. Then you can use an app called ClipGrab. ClipGrab is a free downloader and converter for YouTube, Vimeo, Metacafe, Dailymotion and many other online video sites.
It converts downloaded videos to MPEG4, MP3 or other formats in one step. It’s available for Windows, Mac, and Linux platforms. Clipgrab is reliable, free, and doesn’t put malware on your computer like a lot of free apps and browser plugins.
Concepts, Tools, Techniques Covered
Tools and Techniques
- Video
- Audio
- Keyframing
- Blend Modes
- Smart object conversion for video
- Applying Smart Filters to video segments
- Layering smart video clips to apply seamless transitions
- Layer Style using “Blend If” for color keying
- Color correction
- Advanced selections
- Masks
- Adjustment layers
- Reparation
Concepts
- Chroma Keying in Photoshop using “Blend If”
- Key framing / Tweening
- Blending motion and color
- Composition
- Elements of Art: Line | Space | Shape | Value | Color
- Principles of Art: Harmony | Balance | Proportion | Dominance/Emphasis | Variety | Movement | Rhythm
Process
Part One:
Where to start? Some suggestions….
First, listen to the audio clips.
Go to the class page containing playlists with approved music clips and listen to them to see what intrigues or inspires you:
https://learn.leighcotnoir.com/2015/04/project-playlists/
The password to unlock the page above can be found in the class’ Canvas website. Because it includes copyrighted music, it needs to stay in a password protected place and may not be distributed for non-academic purposes. You may use copyrighted works for educational purposes as it pertains to the Fair Use Act, but you are not able to use the work for commercial purposes.
Once you have made your selections, you can download the music clips via our class’ Canvas learning management system. They are located in our MAT-210 course’s Files link, as well as in the Week 14 module page.
When listening to the clips:
- Be aware that your video must be between 1-2 minutes in duration. You will notice that most clips are NOT a full two minutes long. That means you’ll need to be creative in using different clips together (as in the example works below).
- Think about how some of the clips can be combined, layered with each other, and transitioned together to set a mood.
- Think about how different clips transitioned together can change the mood (from slow to fast, quiet to loud, etc.).
- Also, think about whether or not you want to capture the actual feeling of the audio or instead use it in an ironic way.
- If you are a design student who is determined to make only commercially oriented work for your portfolio, I will entertain proposals that create non-verbal work that feels like a sophisticated marketing material. A good example would be iTunes, fragrance, financial, illustrated/animated commercials. Something for inspiration is the complex Honda flipbook commercial.
- If you are an animator, you can also use this as an animation production, although you will still need to figure out a way to incorporate 2 other videos. An example of even low-stakes animation: https://www.youtube.com/watch?v=yOPJ-wAHiJA.
Collecting resources
First, be sure to understand that the minimum video resolution requirements for this assignment are 720p (1280px x 720px). You can still use smaller video file sizes, though, as long as they only need to be used in a smaller portion of the video (i.e. if you are masking the clip).
Spend time downloading resources so that you will have work to experiment with. If you want to start playing with some files to see how you might be able to manipulate video before making a commitment to specific media, there are Public Domain and Creative Commons files available for download on the MAT server in the “mat210_cotnoir/p4-video-resources/” folder. To preview them on our non-streaming server, you can go to http://mat.miracosta.edu/mat210_cotnoir/p4-video-resources/ . But the best way to get faster previews of Creative Commons clips would be to do a Google search for the their titles and find the hits on the internet.
*For still images, check out image resource sites on the Free Media Resources page.
Some Examples
The following examples below are only intended to give you some ideas of how this project could be approached; these are not prescriptions for how to do your project.
Example One
Work Title: “Illustrated Study of Phenomena on Velocity, Displacement, Deflection, Pressure, Strain”
The above work uses a total of six video clips, four still images, and two music clips. The voiceover is from the unaltered narration which is natively attached to the “Operation HARDTACK Military Effects Studies: Underwater Tests” video. Verbal words/talking and ambient sound are permitted when they are attached to the original video clips that you select.
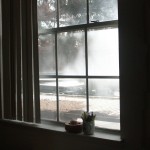
The piece above is assembling a scene to accompany and address the eerie stillness and tympanic impacts of the chosen music clips. It uses two domestic setting still images to create a study with stationary masking areas (book pages and windows) where the events will play out (and a concrete texture image applied to the wall). The video clips combine footage of people diving in a public swimming pool in the left book’s masking area, and the right book masks and transforms the shapes of two public domain movie clips with documentation of underwater nuclear blast testing. The narration of one of the movies ties them together discussing the impact the testing has on objects with relationship to water.
The moving sky video in the window is created by masking out parts of the window areas and placing the sky video on top of all other videos. The airplane is a masked still photo that is key-framed for motion to move across the screen. The insect/fly video is not only scaled and rotated to place it in the right area, but it also uses a Layer Style “Blend If” option to color key (also called “chroma keying”) the insect to knock out the range of light color in the background over all frames (this cannot be done with simple masking). Lastly, the final explosion that comes out of the book vertically at the end of the video is scaled and masked to give the book’s story a three-dimensional quality.
To get a sense of the process, you can look at the original visual resources below:
Video Resources for Work Above:
- Title: “Operation HARDTACK Military Effects Studies: Underwater Tests”
- Title: “Nuclear Explosion”
- Title: “[Nuclear Explosion]”
- Title: “Swimming Pool Diving Board from Above on Vimeo”
- Title: “Clouds and Sky Time Lapse(Timelapse)”
- Title: “A fly walks on the window in slow motion”
Still Image Resources for Work Above


Example Two
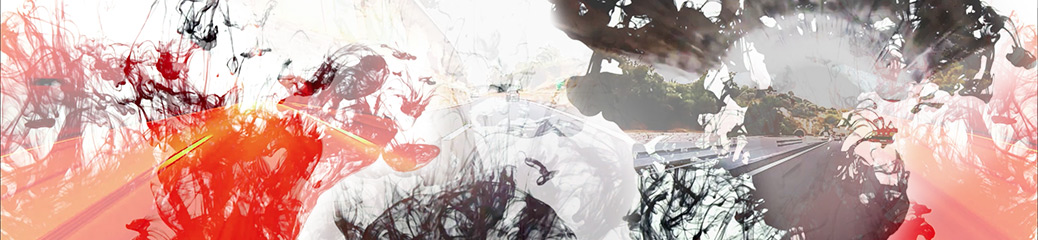
Work Title: “Finding a New Way”
The above work combines far fewer resources but is still effective in its own communication. It was created using three Creative Commons video clips and three sampled music clips. This work is very different not only in feeling and message from the one above, but it also uses different techniques to set up the scene. Because there are not ANY stationary images, we can’t completely rely on simple masking techniques in Photoshop to “mask” moving images. This video instead uses a “chroma-keying” method where you can take a clip with a very high contrast tone and use a Layer Style “Blend If” option to knock out a limited range of color across all frames of the clip. Although Photoshop has some limitations with video production, this piece highlights how some types of files can be used to chroma-key with blend modes. You can view a 4.5 minute demo on using Photoshop’s Blend-If feature.
In the example above, the black ink drop has such high contrast that we can knock out colors that fall in that black range to reveal what is beneath it. Additionally, we can add blend modes to enhance and change the clips as we layer them. To do more sophisticated types of masking across multiple frames, you need to progress to using a tool like Adobe After Effects.
Consider this: All of the following examples can be considered landscapes of sorts. Landscapes are not only defined by dramatic distance and depth of field (as in a countryside or cityscape), but they can also be defined psychologically and by their settings (urban, suburban, surreal, space, pastoral, interior, exterior, domestic, foreign, war, etc.). Think about the types of landscapes that the images below evoke.
Video Resources for Work Above:
- Title: “Clouds and Sky Time Lapse(Timelapse)”
- Ink Drop_Drip in water 004 – Royalty free Stock Footage
- Alex Free Stock Video Footage – Full HD – Highway – Italy – Monte Carlo – GOPR0255
Part Two:
Idea Generation and Story Boarding
Based on your collection of imagery, sketch out a simple “story board” with pencil and paper. These rough sketches will help you work through your ideas of how to conceptually and technically achieve your goals. Specifically, they can help you visualize how you need to stack layers and mask items so that things appear properly in your sequences.
Part Three:
Start Compositing in Photoshop
Based on your resource research and story board drawings, start compositing in Photoshop using Photoshop tools and techniques required in this assignment (see below).
Techniques you should be employing are as follows:
- Video adjustments (duration, trimming, syncing, fade, etc.)
- Audio adjustments (volume, fade, overlay, etc.)
- Video Transitions (fades)
- Keyframing (opacity, transition, layer, etc.)
- Blend Modes
- Smart object conversion for video where necessary
- Applying Smart Filters to video segments where necessary
- Layering smart video clips to apply seamless transitions
- Layer Style using “Blend If” for color keying
- Color correction
- Advanced selections
- Advanced Selections and Masks
- Adjustment layers
- Reparation
- IMPORTANT: layer organization (groups, color-coding
Part Four:
Final Output
The target output for this assignment will be 720p (1280px x 720px). It CAN be larger, but 720p is the minimum. I would recommend this size, though, so that your computer does not bog down with graphics processing of larger files.
BE SURE that the quality looks good at 100% on the native size (1280px x 720px).
Concept and Content Requirements
Concept:
Please refer to the Project’s “Overview” section above for concept requirements.
Content:
- Use a minimum of two separate video source clips as the basis of your composition. You can use as many as you’d like beyond the minimum, but be aware that the more clips you have, the slower it will be to process changes. Be sure that you change the originals enough through Photoshop techniques (see Technical Requirements below) to create an original artwork.
- Use at least one of the instrumental music clips provided by the instructor. If you use shorter ones that do not span your timeline adequately, you need to use more than one clip or repeat the clip in a non-repetitive way.
- Be sure to organize your files so that ALL resources files are saved into a single folder. This is VERY important when uploading files to the server, or else I will not be able to properly grade your PSD files. Set this up correctly from the beginning. For instance:
- PROJECT-4
- project4.psd
- video_file1.mp4
- video_file2.mp4
- video_file3.mp4
- still_image1.mp4
- music_clip1.mp3
- music_clip2.mp3
- music_clip
- PROJECT-4
Technical Requirements
GET A FREE VIMEO ACCOUNT: Go to http://vimeo.com/ to set up a free account for yourself. This will allow you to upload your final mp4 for streaming for the critique. The free account only allows ONE HD upload per month, so make sure that the mp4 you upload is really your final, good version. Alternatively, you can upload to a Youtube channel if you have one, but Youtube might flag your work if it detects any copyrights embedded in the music files. You can also get a free streaming account with http://screencast.com as well.
Technical Setup: …Mode: RGB, …Minimum size: 1280px X 720px at 72ppi, …Resulting image files:
• 1 PSD (lastname_p4_video.psd + ALL linked resource files in SAME FOLDER)
Acceptable runtime range: 1-2 minutes total. You will be deducted points if your clip is shorter than 1 minute. Anything longer than three minutes might become difficult for you to manage with processing.
Resource file requirements:
- minimum 2 video clips
- your external video clips can have their own talking sounds and ambient noise if you want to keep it, but you MAY NOT use overlaid music that comes with many of the downloadable free videos out there. The only music should be the music from the limited list provided by the instructor.
- minimum 1 audio clip selected only from the sources provided by instructor
- still images are optional but likely desireable
Video trimming, syncing, and transitions
Audio transitions where necessary (fades, volume control, trimming)
Video Group organzition/management (see Layers and Layer Groups below)
Smart Object Use, Tracking and Management: “Place” any still image files as “Smart Objects” into the target composition file so that you can dynamically adjust scale without changing the files’ native resolutions.
* Convert non-smart layers into Smart Objects if you need to apply transformations on them in the video key-framing.
* BE SURE to keep Smart Object resource files in same folder as your main PSD composite file. This will make uploading final work easier to avoid broken links.
Layers and Layer Groups: Clearly organize, group, and label your layers for the file.
Selections: Use combinations of appropriate selection tools to create and save complex selections for reuse and masking.
Masks and channels: Use masks and channels to non-destructively “eliminate” portions of the original resource files. Try to avoid using the eraser tool or deleting original content.
Adjustment Layers: Use at least 2 non-destructive layer adjustments to adjust color or tonal range.
Layer Styles, Blend Modes, and Filters: Use at least two of these techniques to create effects in color, transparency, or filtering effects on clips in the timeline.
Keyframing: Use reparation tools (healing brushes, clone stamp, content-aware tool, etc.) as necessary to correct blemishes or undesirable visual content in areas you need to keep in the composition.
Color, Lighting, and Contrast Balance: You will also be graded on the overall successful manipulation of color, lighting, and contrast balance in the work. Be sure that your effects are suitable to the work (appropriately harmonious, which can also include properly applied discordant colors).
Due at the Critique
- Upload the following to the server in your student directory (see Canvas for server connecting info):
- project4_lastname (FOLDER)
- lastname_p4_video.psd
- lastname_p4_video.mp4
- all supporting linked files with functional links.
- project4_lastname (FOLDER)
- Upload your final lastname_p4_video.mp4 file to Vimeo or or other free streaming service of your choice. You can also get a free streaming account with http://screencast.com as well.
- Post your streaming video link to to the assignment’s discussion forum in Canvas, along with your artist statement.
Example Student Work
You can check out https://vimeo.com/album/3630844 to see examples of some previous student work.