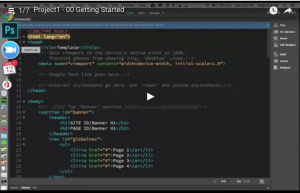
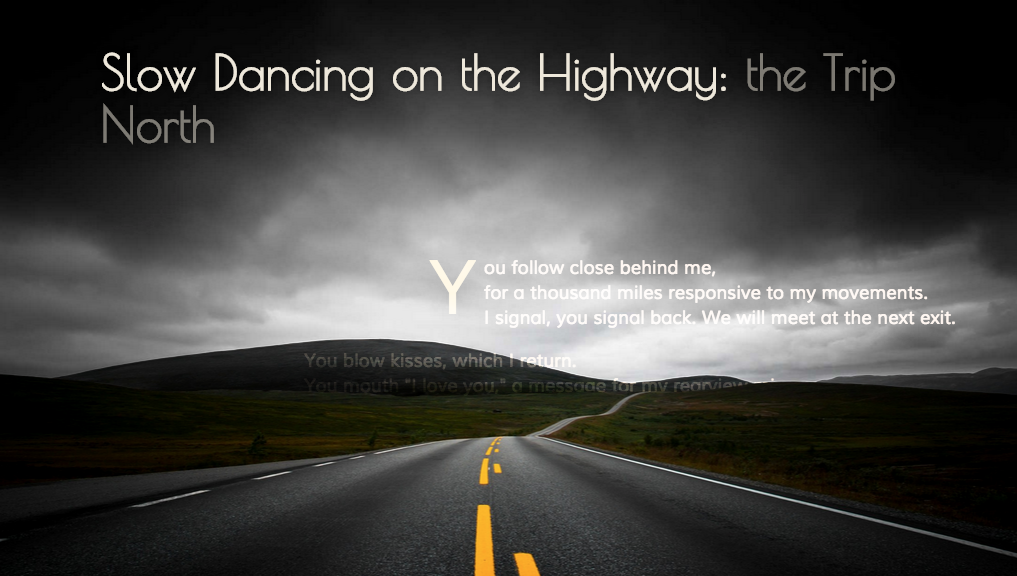
This video tutorial will walk you through the major steps in how the following short movie was created:
CSS – Creating a Mobile-First Design Template
Creating a Mobile-First Design Template for Your PHP Project
This demo will give you guidance in styling a web page with HTML5 markup from a mobile-first design approach. It covers the following concepts, principles, and methods:
- the php/html starter file’s proper markup
- how to add Google Fonts to a design
- using a viewport/device-width meta tag
- removing native browser styling with a ‘reset’ css file
- using @viewport and @-ms-viewport in CSS
- designing for smallest screens in mind first
- using @media queries to alter layout on larger screens
- styling a baseline for very commonly used elements
To follow along with these videos using the exact same markup, download the template ‘project1’ folder in a zipped file. After downloading, unzip and place the unzipped folder into your “htdocs/” folder to work on the files.
Creating a Mobile-First Responsive Site Template
(7-Part Video Demo Playlist BELOW)
Approximately 2.5 hours of demo. Expect the work you do to create your own base design template to take a minimum of 8 hours.
00 – Getting Started (19:37)
01 – Start Styling (27:49)
02 – Styling the Banner (24:46)
03 – Styling the Banner’s NAV (22:25)
04 – Styling the Baseline Content (20:53)
05 – Styling the Baseline Content (Continued 14:26)
06 – Styling the Footer / Using Additional Breakpoints (22:51)
Want to learn more about using Google Web Fonts?
Check this video out.
Useful Project Resources
- Mobile-First Responsive Web Design (good article by Brad Frost)
- CSS Reset: http://www.cssreset.com/
- Font Shorthand Order
- CSS3 Transitions
- CSS3 Generator (tool that helps you generate box shadows, text shadows, gradients, button styles, etc.
XAMPP – TURN YOUR MAC INTO A DEVELOPMENT SERVER
Installing XAMPP on your MAC personal computer
XAMPP stands for “X (one of four OSs), Apache, MySQL, PHP, PERL” and is used to enable your personal computer with the web and database tools necessary to host its own dynamically driven websites for testing and development purposes. The following tutorial video demonstrations will show you the steps to set your computer up as a “localhost” server on a Mac. Continue reading XAMPP – TURN YOUR MAC INTO A DEVELOPMENT SERVER
XAMPP – Turn your PC into a development server
Installing XAMPP on your personal computer
XAMPP stands for “X (one of four OSs), Apache, MySQL, PHP, PERL” and is used to enable your personal computer with the web and database tools necessary to host its own dynamically driven websites for testing and development purposes. The following tutorial video demonstrations will show you the steps to set your computer up as a “localhost” server on Windows. Continue reading XAMPP – Turn your PC into a development server
HTML – Start Coding with HTML
This tutorial will walk you through getting started with HTML coding. It covers basic principles of how to create different semantic tags to organize the structure of your page content. Continue reading HTML – Start Coding with HTML
SFTP – Cyberduck for mat.miracosta.edu
Get Connected
Although this page is a tutorial on using Cyberduck, there are several free SFTP software packages you can use:
Mac users : Cyberduck, Filezilla, Fugu
PC users: Cyberduck, Filezilla, WinSCP
Miracosta College has a help desk webpage that shows you how to use Fugu and WinSCP here: http://www.miracosta.edu/studentservices/studenthelp/tutorials/matserver/index.html
The instructor happens to prefer Cyberduck and Filezilla. NOTE: Filezilla’s interface is not quite as friendly as Cyberduck’s.
Using Cyberduck for SFTP
In the first video of the playlist below, you will learn how to use the SFTP program, Cyberduck, to connect to your Miracosta College student web directory.
The second video continuation covers how to create the folder structure on the server for our class, how to create and rename files, how ‘index’ files work vs. other files, and how to view your uploaded work on the web.
Free Media Resources
First, Understanding Media Rights
What are the differences between Creative Commons, royalty-free, copyright-free, rights-managed, and public domain media resources?
You can also click individual section titles to expand or close them separately.
What is a copyright?
“Copyright is a form of intellectual property protection provided by the laws of the United States. Copyright protection is available for original works of authorship that are fixed in a tangible form, whether published or unpublished. The categories of works that can be protected by copyright laws include paintings, literary works, live performances, photographs, movies, and software….
It’s important to understand that copyright law covers the “form of material expression,” not the actual concepts, ideas, techniques, or facts in a particular work. This is the reason behind why a work must be fixed in a tangible form in order to receive copyright protection. A couple examples of works being fixed in a tangible form include stories written on paper and original paintings on canvas….the Copyright Act gives the copyright owner certain exclusive rights, including the right to:
- Reproduce the work
- Prepare “derivative works” (other works based on the original work)
- Distribute copies of the work by sale, lease, or other transfer of ownership
- Perform the work publicly
- Display the work publicly
-from FindLaw article, What Is a Copyright?
Other reading:
- “What Is a Copyright?” – Plagairism Today
- “Copyright Protection – What It Is, How It Works” – Stanford University Libraries
“Copyright free” is not a legal term and is often misused. Work that can be described as “copyright free” is simply work not protected by a current copyright. The term is often mistakenly and incorrectly used in place of “royalty-free,” but these are completely different concepts and not interchangeable in any way. Describing work as “copyright free” is another way of identifying work within “public domain,” which is free to use and modify.
reference: “Royalty Free or Copyright Free? Are They the Same?” – Public Domain Sherpa
First let’s define a royalty.
A royalty is a per-use contractual fee that is paid to an author/creator/artist/copyright-holder for the use or reproduction of the copyrighted work.
Types of fee-based reuse licensing are either “rights-managed” or “royalty-free”.
Rights-managed royalties are typically specific to type, location, and frequency of use, and as such, each time the work is used, a separate royalty fee must be paid to the copyright holder.
Royalty-free use is a type of contract or licensing that typically allows a one-time fee under a set of usage guidelines so that the licensee (user) can use the work in perpetuity without additional charges as long as there is adherence to those contractual guidelines.
*It is important to note that “royalty free” does NOT equate to “free.” Nor does it equate to “copyright-free.” In fact, the presence of any royalty licensing fee means that an entity is paying to use/reproduce copyrighted work at least once.
good reference article: “The Difference between ‘Royalty-free’ and ‘copyright-free’ – Making a Mark
What is Creative Commons and how do I interpret the licenses?
“Creative Commons (CC) is a global nonprofit organization that enables sharing and reuse of creativity and knowledge through the provision of free legal tools” (copyright “use” licenses with varying levels of protections for copyright holders). This tiered licensing allows creators to comfortably and easily “share” their work by assigning an appropriate CC license that best suits the creator’s legal needs while also allowing others to reuse their work. You can view many of their platform partners on the CC site to see where you can download CC materials.
At the time this post was written, there are six tiered CC license options that basically fall under two categories: 1) any use + 2) Non-Commercial Use. There are three licenses within each of those two categories:
- Attribution “lets others distribute, remix, tweak, and build upon your work, even commercially, as long as they credit you for the original creation.”
- Attribution-ShareAlike…Same as above, but users must also license their new creations under the creator’s identical terms. “All new works based on yours will carry the same license, so any derivatives will also allow commercial use.”
- Attribution-NoDerivs “license allows for redistribution, commercial and non-commercial, as long as it is passed along unchanged and in whole, with credit to you.”
- Attribution-NonCommercial…same as “Attribution” but it disallows any commercial use at all.
- Attribution-NonCommercial-ShareAlike…same as “ShareAlike” but it disallows any commercial use at all.
- Attribution-NonCommercial-NoDerivs…same as “NoDerivs” but it disallows any commercial use at all.
The language above is summarized from their “human-readable” non-legalese language. To understand important details before using or designating your own work with a CC license, though, you should read their “legal-code” documents, which is more specific and binding. For a complete explanation of CC licenses, visit their About the Licenses page.
*It is noteworthy that creators can license material under other licenses in addition to the CC license (a practice commonly referred to as “dual licensing”), as long as the other license does not conflict with the CC license. For example, creators can offer material to the public under a NonCommercial license, but offer commercial permissions to fee-paying customers through some other agreement.
IMPORTANT! Just because you are learning about copyright rules doesn’t mean that everyone else cares about them. If you find work licensed under a Creative Commons license, it doesn’t necessarily mean that the “creator” did not poach from protected copyrighted material. If CC licensed work inappropriately includes unpermitted work protected by someone else’s copyright, you can potentially still be liable for misusing it without proper permission.
See the “royalty-free” question above to learn about rights-managed royalties.
Basic Definition
Simply put, work that falls under the public domain lacks a current copyright.
Typically, work that lacks a copyright does so because it has expired or because it is so old that it preceded copyrights.
How can I be sure something is Public Domain?
To know definitively if a copyright has expired or not, there are a few ways you can find out. First, it is important to know precisely when the work was created since there are several complex rules that determine copyright eligibility and expiration dates.
Doing the Research Yourself
- Anything published prior to 1923 is within the Public Domain. This detail is the only way to know for certain that something is in public domain without doing further research.
- Anything published 1923 and later should be researched if you are using the work commercially or if you are using a significant portion of it in a non-transformative way. Another terrific resource for helping you get started with this research is the “Copyright Term and the Public Domain in the United States” page of the Cornell University Library.
- Renewal records for works published from 1950 to the present are available online at www.copyright.gov
- Researching works published before 1950 can be performed at the Copyright Office in Washington D.C. or possibly at a Federal Depository Library.
Paying Someone to Research a Copyright
You can also contact the Copyright Office to check renewal information for you, at a charge of about $150 per hour. (Reference & Bibliography department: 202-707-6850.) You can also hire a private copyright search firm to see if a renewal was filed.
What is Fair Use and what does it mean for me?
The Fair Use clause (#107) within the U.S. Copyright Act is simultaneously specific and also somewhat ambiguous in its limitations to copyright protections. The Fair Use clause aims to enrich public discourse by allowing limited “reproduction” and citation of copyrighted material for the purposes of criticism, comment, news reporting, teaching, scholarship, and research. The only specific considerations the clause gives are the following factors:
- the purpose and character of the use, including whether such use is of a commercial nature or is for nonprofit educational purposes;
- the nature of the copyrighted work;
- the amount and substantiality of the portion used in relation to the copyrighted work as a whole; and
- the effect of the use upon the potential market for or value of the copyrighted work.
It is widely accepted that these considerations allow for citation and brief sampling of work for academic and non-commercial use as long as the use does not adversely compete with and affect the commercial viability of the copyrighted material. For instance, if a professor reproduces a significant portion of a copyrighted course material for distribution to students, this might be considered infringement if this activity discourages students from purchasing media with a licensed reproduction of the work. But if a student cites passages of that same work as support for a term paper, it would be acceptable fair use by the standards above since it is for research with non-commercial applications and since it will not impact the work’s marketplace competitiveness.
While many people will try to quantitatively define what percentage of a work is acceptable to reproduce without permission, the law remains purposefully unclear to retain flexibility on a case-by-case basis. A very good example is in the 2016 case of Cambridge Press vs. Georgia State University, where three publishers sued the school over its pervasive posting of digital excerpts to the library reserves. In this case the lower court ruling took all four of the above Fair Use guidelines into consideration, and the judge used a 10% line-in-the-sand to determine what was an excessive violation of the Fair Use clause. But upon appeal, a higher court found fault with the district court’s arithmetic methodology, determining that fair use decisions must be conducted on a case-by-case basis instead of setting a percentage precedent. After reconsidering the appeal and weighting the clause’s factors differently, the district court still ruled mostly in GSU’s favor, but they still cited 5 of the 99 instances in the suit to be in violation of Fair Use.
The third factor above is one where the concept of “transformative use” comes into play. This is one where courts have had uniquely complex decisions to make about whether or not infringement has occurred based on how much someone changes the original copyrighted work while using it in their own work. A well publicized example of this type of infringement is Shepard Fairey ‘s “Hope” poster of President Obama. The Associated Press (AP) sued Fairey for using a cropped version of one of its copyrighted photos for significant monetary gain without first getting permission to do so and without “transforming” the image enough to transcend the original image’s representation. This is an example of how artistic appropriation can quickly go from being perceived as cultural commentary and artistic expression to a form of theft once commercial considerations come into play. Had the poster not generated over $400,000 in revenues, the AP might have merely sent a Cease and Desist order to prevent its further unpermitted usage (or even simply done nothing at all).
Although the “Hope” case was settled between the two parties, it still did not definitively define the quantitative level of “transformation” that is required by a creator to make the new work original and not illegally derivative. The law purposefully remains a grey area so that cases are open to qualitative judicial interpretations. So when the question is asked, “How much do I have to change something to use it without permission or attribution?”, the answer is still open to interpretation. The best answer is to genuinely evaluate the new work from an honest perspective and determine whether or not the underlying meaning of the original work has been significantly changed through its inclusion and how much the new work relies on the original’s meaning or representation to carry the weight of the new work. Parody and satire will often have somewhat different standards, but this general rule still applies. And when it comes to making work that you expect to be significantly commercially viable, it is safe to assume that the standard is much, much higher. If there might be any commercial gain from the reuse, you should get permission first if there is not a clear Creative Commons license that outlines its use guidelines.
Excellent Fair Use Resources for Faculty
The University of Denver has a great resource of best and bad practices for faculty academic Fair Use. I strongly recommend you check it out if you are a faculty member and want to know what is generally considered to be safe. Additionally, the University of Texas Libraries site has a very good Copyright Crash Course section that goes into detail and can answer questions you might have.
Finally, here’s a link to a checklist that might help you decide if you are using copyrighted material within the Fair Use scope: the Teach Act checklist.
What is “attribution” and how do I give it?
Including “attribution” in your work is to give explicit credit to authors of other works you used in the creation of your own piece. Attribution typically includes the title of the work, the name of the author, the type of license it has, and a link to the original work and to the author’s profile if possible. The medium of your own work will also often dictate what is appropriate for giving credits, and the creator’s license will sometimes explain how you should give credit.
If using a Creative Commons resource, you can use their guidelines for giving attribution.
For some websites, there are browser extensions, such as Open Attribute, that work well for copying the attribution information that is gathered from the resource’s metadata. Flickr’s creative commons resources work well with this tool.
Some other websites, will have a page about licensing that will give you tips on how to credit their creators’ resources, such as the licensing page for unsplash.com.
To give attributions at the end of a video in a credit role, they can be as simple as following some of these guidelines.
What is considered “commercial use”?
“Commercial use” and “Non-commercial use” are defined within specific legal contracts, so there is actually no binding, catch-all definition out there that draws safe boundaries for these terms. You have to look at the specific licensing contract for each copyrighted item out there before ascertaining what “commercial” means and how it impacts your intended use of the copyrighted property.
To understand the Creative Commons organization’s interpretation of “Non-Commercial” use, you can go straight to the horse’s mouth and read their explanation. But even then, some people feel that creators might find themselves in ambiguous territory should a problem actually arise later. And users can also find it confusing about what’s acceptable usage depending on how the website provides licensing info and whether or not the creator has tried to tack on additional stipulations for use.
To better navigate using and interpreting how one can reuse CC non-commercial properties, check out the following article by Molly Kleinman:
http://mollykleinman.com/2008/08/21/cc-howto-2-how-to-use-a-work-with-a-noncommercial-license/
She discusses the importance of drilling down into their “legal-code” language rather than relying purely on the ambiguities of the “human-readable” language. Furthermore, she gives good examples that might otherwise be confusing.
Aside from CC licenses, commercial use is typically spelled out in the copyrighted work’s licensing agreement, should one exist prior to requesting reuse or paying for the privilege of reproducing it. Read the license carefully.
It is important to note, though, that the Fair Use clause of the Copyright Act still supersedes how copyrighted work can be reproduced—regardless of “non-commercial” status—as long as the use falls under the umbrella of Fair Use practices.
Where to find free media resources….
Some quick search tools that will filter based on CC license type:
Check out the sections below, though, for a wealth of great free resources based on media type.
Free Image Resource List
- Flickr Creative Commons
- Unsplash (all free to use commercially or non-commercially)
- Morguefile (license)
- Google Image Advanced Search (filters for usage license types and resolution)
- Pikwizard (license)
- Negative Space (license)
- Death to Stock (license)
- Picjumbo (license)
- Stockpic (license)
- Kaboompics (license)
- Startup Stock Photos (license)
- Freerange (license)
- LibreShot (license)
- Fancy Crave (license)
- StockSnap.io (license)
- SplitShire (license)
- Life of Pix (license – Public Domain)
- Pexels (license)
- Gratisography (license CC0)
- Jay Mantri (license)
- Pixabay (license CC0)
Free Video Resource List
- Vimeo Creative Commons,
- Internet Archive,
- Mixkit.co,
- Videvo,
- Pexels,
- Mazwai,
- We Distill,
- Beachfront B-Roll,
- Videezy,
- Life of Vids
- Youtube
NOTE: To search Youtube for Creative Commons licensed video, you must follow the search term with a comma and “creativecommons” all run together (no quotes). Here’s silent instructional video with steps on searching and then downloading video from Youtube:
Free Audio Resource List
Below are some terrific sites for collecting creative commons or public domain audio resources. Be aware that you have to create a free account and be logged into most of them to get download links for the audio.
- MuseHub SFX
- free computer app/plugin for high-quality sound and loop searches to drag/drop into Audacity!
- MusicRadar
- SampleFocus
- BBC Sound Effects (Not for commercial use)
- FreeSound
- Internet Archive
- MusOpen (classical music recordings)
- FMA
- Mixkit.co
- YouTube Audio Library (must log into Gmail first)
- You can also make your own sound loops from a large selection of sound samples at http://www.ambient-mixer.com/ and record very short segments for loops. This has a lot of non-music samples, too, and while the downloads are not free, you can get free download code for signing up.
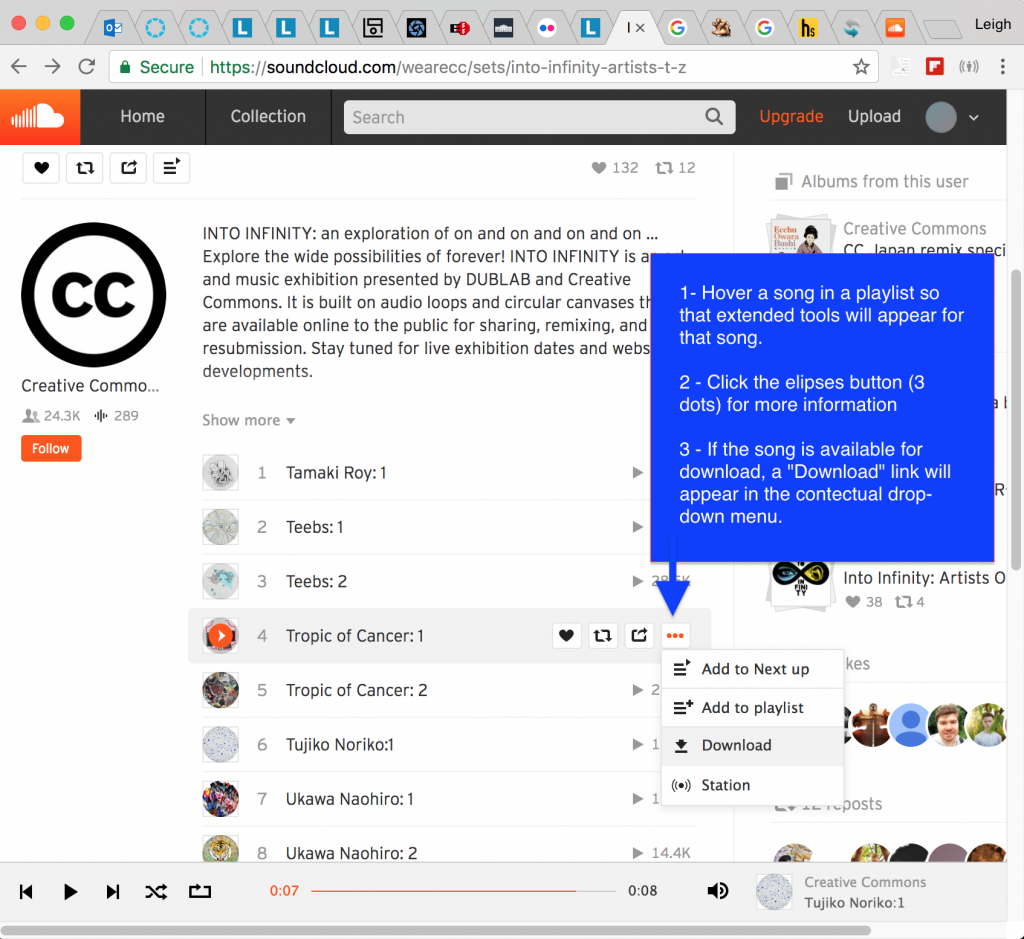
Sometimes SoundCloud Download links can be hard to find. Refer to the infographic below to see where the download link can be buried. Not all songs are designated by the owner for download, though.
Convert or Snag Audio
Some creators will post work to websites and designate their work available to reuse under a CC license but then forget to make it downloadable. Should that happen, you can still use an online converter service to snag the audio and download it. Check out the Clip Converter website (http://www.clipconverter.cc/ ).
Black Box Communication Study
Communication and Meaning Study / Assignment
Consists of in-class study + expanded homework graded assignment
Quick links on this page:
- Initial Study Objectives
- Final Refinement Objectives
- In-Class Study Instructions
- Homework Refinement Assignment Instructions (graded)
Objectives
Initial Study Objective
Use the Elements and Principles of Design to convey concept within strict formal constraints.
Final Refinement Objective
Develop the concept into a single, refined finished piece, effectively adding typography, color, and graphics enhance conceptual communication.
In-Class Study Instructions
Using only 4 FLAT BLACK SQUARES within a square canvas you create a graphic that will visually convey the following:
- ORDER
- BOLD
- CONGESTION
- TENSION
- PLAYFUL
Illustrator document Setup
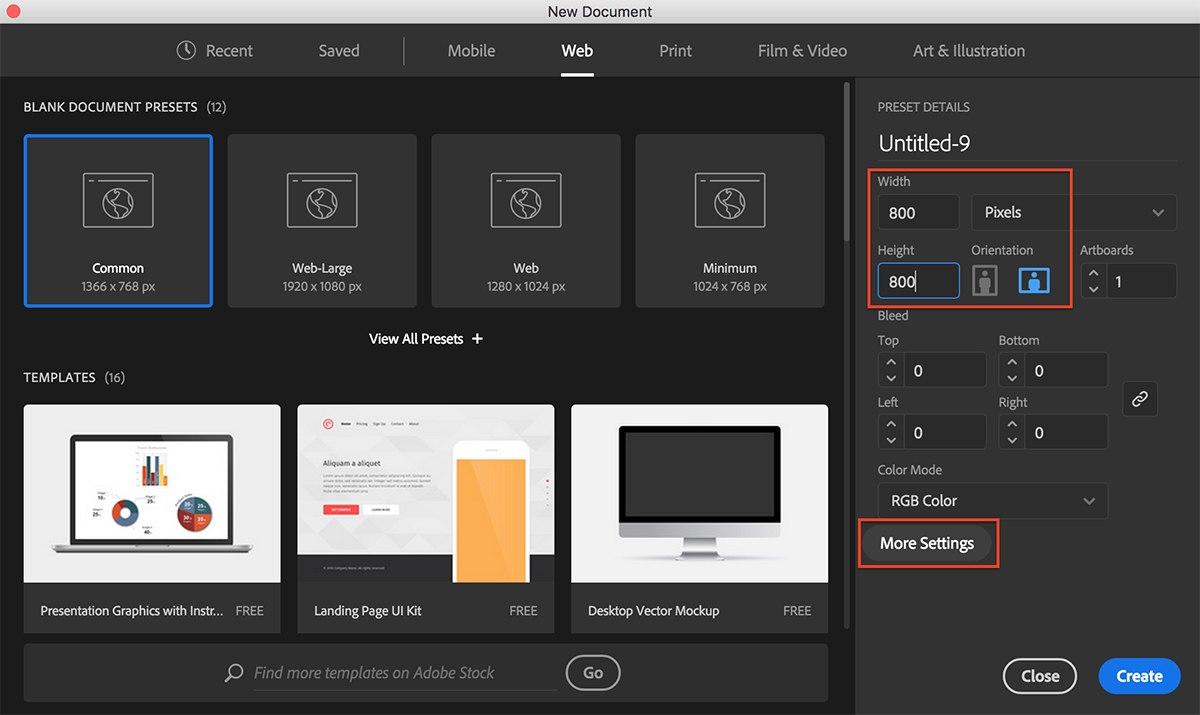
- Make a folder called “bb-communication-study”. Create a new Illustrator document at 800px X 800px.
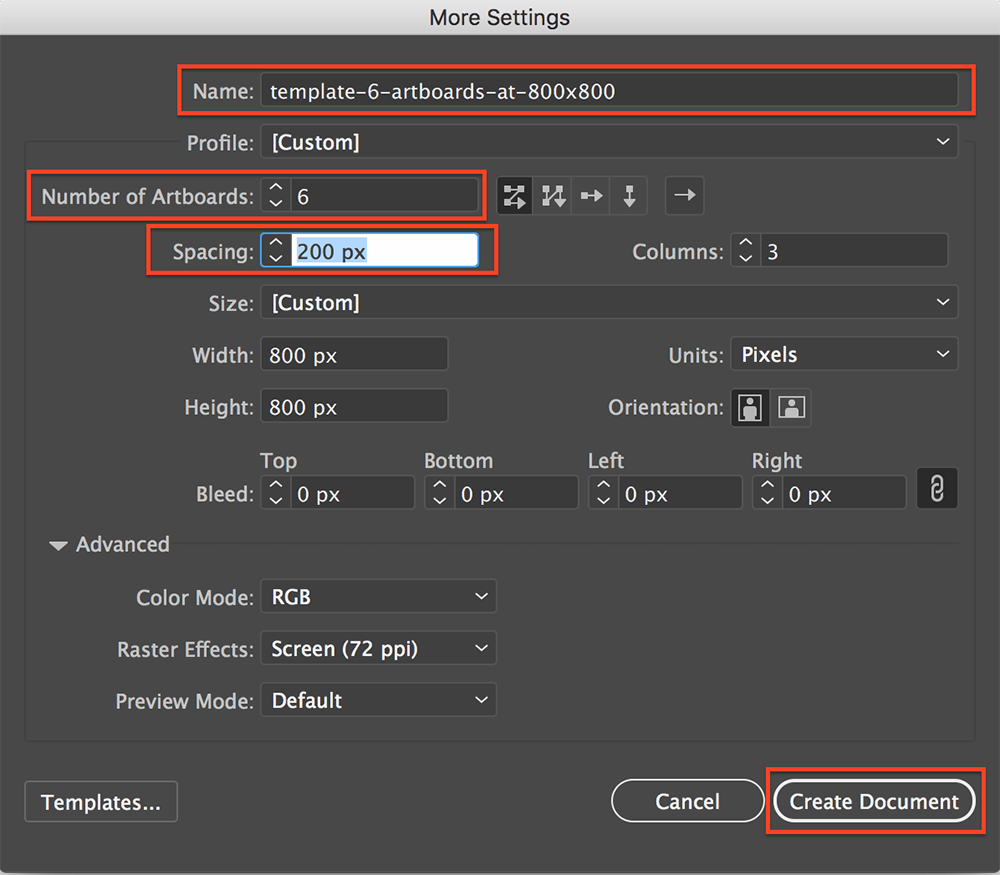
- Click the “More Options” button to increase the number of artboards to 6, and title the document “template-6-artboards-at-800×800”.
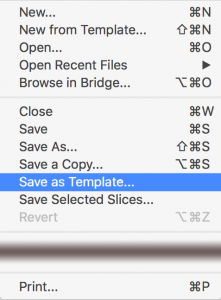
- Once it opens the new file, save it as a template. It will append “.ait” at the end of the filename.
- Next, do a “File >Save As” command and give it the name of the word you want to start with, such as “order-yourlastname.ai”.
Next: Arranging the Squares into Compositions
- On at least FOUR artboards, create different compositions using only black boxes that depict the given word.
- You can modify scale and the box arrangements, including overlapping shapes and extending beyond the picture plane.
- You can also add a white stroke if you wish, as well as adjusting the stroke size if so desired.
- You can do up to 6 compositions as long as you don’t take more than 10 minutes per word total.
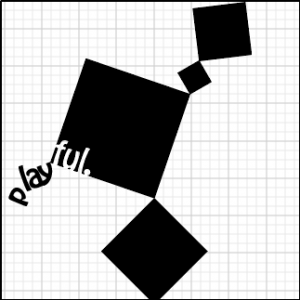
- For reference, here are some examples of the word “playful“

- HINT: It will serve you well to make a new layer for each composition so that your vector objects stay well-organized. This will be helpful later. To avoid accidentally adding objects to the wrong layers, lock the layers you want to avoid using.
- Save that file and close it.
- Repeat the process for each additional word by doing the following:
- choose “File > New from Template,”
- select the “template-6-artboards-at-800×800.ait” template you made,
- save it as the next word (ex: “playful-yourlastname.ai”),
- make your six new compositions,
- Close and repeat this process until you are finished.
- Don’t spend more than 10 minutes on each word (or 50min total).
Uploading for In-Class Critique
Once you have finished making arrangements for each word, open all of the saved files so that you can review the compositions and decide which one is your favorite for each word. For each file, do the following:
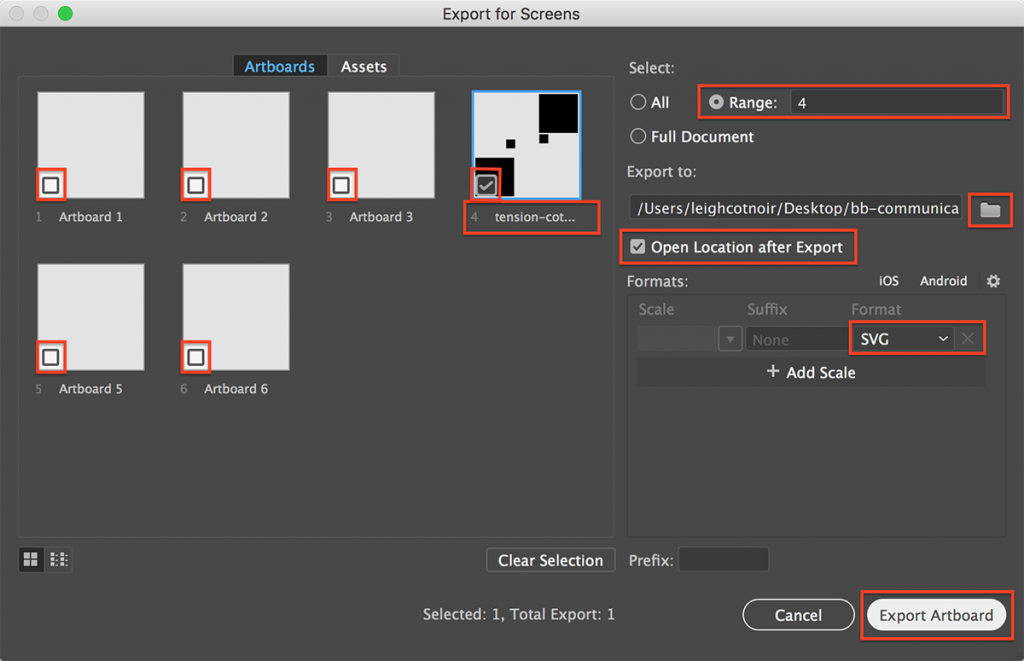
- go to “Export > Export for Screens”,
- isolate your favorite artboard for the word by deselecting the other artboards,
- double-click the artboard name and rename it (eg. “tension-yourlastname”)
- choose where you want to save the file under “Export to:” by clicking the folder icon,
- select the desired export file types (SVG = scalable vector graphic)
- Click “Export Artboard.
Once you have done this for each one, be sure that the resulting filenames use the correct naming convention (eg. “tension-yourlastname.svg) with the word BEFORE your last name. Then upload all of them to the folder specified by the instructor.
HOMEWORK ASSIGNMENT REFINEMENT
After you have completed the studies above, select the single composition you feel is the most successful of your 20 digital sketch iterations. That means you’ll only choose one composition from one word to work with.
1 : Setting up a new artboard in AI
Before embellishing the selected composition in your Illustrator file, you should duplicate the artboard. Open the word file for the comp you have selected, such as “playful-lastname.ai”, and create a new artboard that is 800px X 800px.
- Copy all of the contents of the chosen comp,
- Select the newly created artboard by clicking on it,
- Create a new layer in the Layers panel, and while the that layer is selected along with the new artboard, go to “Edit > Past In Place.” This will place a duplicate set of objects in your new artboard and within a new layer so that you can keep track of your original design iteration.
- Lock the other layers not in use and continue.
2: Add Typography
You will first add typography to the piece based on the communication you want to have, including the word you are portraying. Spend time truly exploring a range of type. Do not simply settle on a face after looking at type for only 10 minutes. Selecting appropriate fonts takes time. If you do not have a good selection of fonts on your computer, explore free, downloadable Google Fonts, as well as other free fonts from websites like DaFont.
If you want a primer on using the Google Fonts tools, you can watch the following video demonstration:
Add typography in the form of your word (or a slightly modified version of it if it suits you), playing with font style (regular, bold, condensed, etc.), scale, placement, letter-spacing, and even the letterforms if it makes sense. To modify actual letterforms (shapes of the letters), you will need to convert the type into vector shapes by selecting the text and going to “Type > Create Outlines.” After doing this you can individually modify the anchor points with the white arrow tool (“Direct Selection Tool).
When you find a solution that might work, duplicate your work into a new artboard and layer iteration to continue experimenting. Keep track of every iteration through the artboard process so that you have a record of your design evolution and explorations.
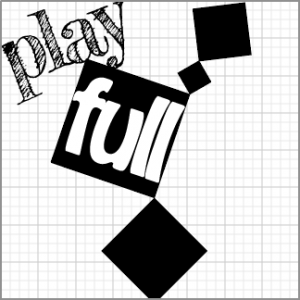
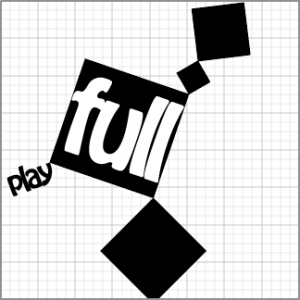
The examples below use both the actual word, “playful”, as well as word play on two words, “play” and “full”:
3: Add imagery
Once you have started exploring the addition of typography with at least a couple of iterations, create a new artboard that allows you to add imagery. To add images properly in an Illustrator file, use the “File > Place” menu command. You should download, move, or make a copy of the original image file(s) inside the same folder in which the Illustrator file resides. This is because files are LINKED to one another in Illustrator, not embedded. If you don’t do this, you will very likely lose the image when transporting your files from one computer to another (including turning work in for evaluation).
When selecting imagery, steer clear of trite or predictable memes. Try to think outside the box (no pun intended).
To fully explore the best range of possibilities, you must make a minimum of 8 iterations of the selected study composition with typography and imagery. Evidence of all iterations must be present in your AI file for full credit.
Example iterations (hover for descriptions of changes):
4 : Completing and turning in the assignment
- When complete, you need to go to “File > Package” to create a folder that has all assets and fonts necessary for the instructor to grade your work and for you to be certain you aren’t missing any asset files or specialty fonts.
- Next, use “File > Export > Export for Screens” to archive your artboards as jpg or png files so that you have rasterized versions of the images. Save them into your packages folder.
- Finally, upload your work to the server in the location designated in class by the instructor when finished.
Animate CC – The Basics + Basic Video Project
Tutorials for Learning Basic Animate CC Skills + Collaborative Project Techniques
This set of tutorials is geared toward helping students complete the second project for MAT-120, but it can still be used by others to learn specific skills using Animate CC (formerly calledFlash Professional). Below is an outline of what you will find in the tutorials. Some students might be able to skip some lessons based on their current knowledge of certain tools and concepts.
Continue reading Animate CC – The Basics + Basic Video Project
WordPress Installation and Backup in cPanel Class Server
A Web Developer’s Process
While there are simple single-click installation options on most servers nowadays for installing WordPress, these obfuscate important details of the installation process that you should understand.Using single-click installations without knowing how the application really works is dangerous if you become dependent upon a site and later cannot properly maintain, backup, restore, and repair it when it breaks.
It is incumbent upon you as a designer-developer and webmaster to truly understand all the ins-and-outs of how WordPress works, troubleshooting WP, managing the files and database, and ensuring that you always have full backups at all times and know how to restore them.
That being said, below are tutorials laid out in distinct phases that will help you understand all of the important steps in installing and backing up a WordPress site….
Build Your First WordPress Self-Hosted Site
WordPress Basics
The playlist of video tutorials on this page will walk you through the steps necessary for understanding the basic organization of WordPress’ content entry options, plugins, themes, and settings. Furthermore, it addresses content strategy, navigation strategy, how to begin understanding what should be a post vs. a page, how to create and publish the content, and how to decide on a theme that’s right for your needs.
Below are two sections:
- where you can either access individual video links from the playlist, seeing the specific topics covered in each
- the full playlist
View Full Playlist Here:
Protected: MAT-125 : HTML Quiz Answers
Brackets – Setup and Configuration
Setting Up Brackets
This three-part video will show you how to set up Brackets, a free open-source code editor by Adobe.
Photoshop: Using Blend-If for Video
How To Get a Green Screen Effect In Photoshop
The video demo below will show you how you can use the “Blend-If” layer blending mode option to chromakey out ranges of color from a video file in the video timeline. This is the closest Photoshop currently comes to having a “green screen” effect (as of 2016) on moving videos.
Illustrated Poem Demo (Images & Positioning)
To follow along with the demo in playlist video series below, you will want to download a starter image file:
Click to open image in new tab; then right-click it to save to your computer.
This playlist is not complete yet but will be updated soon. It currently takes you through the first 8 steps of the demo project.
CSS Properties Compilation
What this page does
This page is a compilation of commonly used CSS properties and is intended to make it easier for students to search for the type of property they might need to use based on the general categories above. To learn more about each property on this page and its syntax and acceptable values, click the property name. It will take you to the exact w3schools.com page for detailed information on each property.
CSS Font Properties
|
Property |
Description |
|
Sets all the font properties in one declaration |
|
|
Specifies the font family for text |
|
|
Specifies the font size of text |
|
|
Specifies the font style for text |
|
|
Specifies whether or not a text should be displayed in a small-caps font |
|
|
Specifies the weight of a font |
CSS Text Properties
|
Property |
Description |
|
Sets the color of text |
|
|
Specifies the text direction/writing direction |
|
|
Increases or decreases the space between characters in a text |
|
|
Sets the line height |
|
|
Specifies the horizontal alignment of text |
|
|
Specifies the decoration added to text |
|
|
Specifies the indentation of the first line in a text-block |
|
|
Specifies the shadow effect added to text |
|
|
Controls the capitalization of text |
|
|
Used together with the direction property to set or return whether the text should be overridden to support multiple languages in the same document |
|
|
Sets the vertical alignment of an element |
|
|
Specifies how white-space inside an element is handled |
|
|
Increases or decreases the space between words in a text |
CSS3 Text Properties
|
Property |
Description |
|
Specifies how to align the last line of a text |
|
|
A shorthand for setting text-emphasis-style and text-emphasis-color in one declaration |
|
|
Specifies how justified text should be aligned and spaced |
|
|
Specifies how overflowed content that is not displayed should be signaled to the user |
|
|
Specifies line breaking rules for non-CJK scripts |
|
|
Allows long words to be able to be broken and wrap onto the next line |
CSS List Properties
|
Property |
Description |
|
Sets all the properties for a list in one declaration |
|
|
Specifies an image as the list-item marker |
|
|
Specifies if the list-item markers should appear inside or outside the content flow |
|
|
Specifies the type of list-item marker |
CSS Background Properties
|
Property |
Description |
|
Sets all the background properties in one declaration |
|
|
Sets whether a background image is fixed or scrolls with the rest of the page |
|
|
Sets the background color of an element |
|
|
Sets the background image for an element |
|
|
Sets the starting position of a background image |
|
|
Sets how a background image will be repeated |
CSS3 Background Properties
|
Property |
Description |
|
A shorthand property for setting all the background properties in one declaration |
|
|
Specifies the painting area of the background |
|
|
Specifies one or more background images for an element |
|
|
Specifies where the background image(s) is/are positioned |
|
|
Specifies the size of the background image(s) |
CSS Border Properties
|
Property |
Description |
|
Sets all the border properties in one declaration |
|
|
Sets all the bottom border properties in one declaration |
|
|
Sets the color of the bottom border |
|
|
Sets the style of the bottom border |
|
|
Sets the width of the bottom border |
|
|
Sets the color of the four borders |
|
|
Sets all the left border properties in one declaration |
|
|
Sets the color of the left border |
|
|
Sets the style of the left border |
|
|
Sets the width of the left border |
|
|
Sets all the right border properties in one declaration |
|
|
Sets the color of the right border |
|
|
Sets the style of the right border |
|
|
Sets the width of the right border |
|
|
Sets the style of the four borders |
|
|
Sets all the top border properties in one declaration |
|
|
Sets the color of the top border |
|
|
Sets the style of the top border |
|
|
Sets the width of the top border |
|
|
Sets the width of the four borders |
CSS3 Rounded Corners Properties
|
Property |
Description |
|
A shorthand property for setting all the four border-*-*-radius properties |
|
|
Defines the shape of the border of the top-left corner |
|
|
Defines the shape of the border of the top-right corner |
|
|
Defines the shape of the border of the bottom-right corner |
|
|
Defines the shape of the border of the bottom-left corner |
CSS3 Shadow Properties
|
Property |
Description |
|
Adds one or more shadows to an element |
|
|
Adds one or more shadows to a text |
CSS Margin Properties
|
Property |
Description |
|
A shorthand property for setting the margin properties in one declaration |
|
|
Sets the bottom margin of an element |
|
|
Sets the left margin of an element |
|
|
Sets the right margin of an element |
|
|
Sets the top margin of an element |
CSS Padding Properties
|
Property |
Description |
|
A shorthand property for setting all the padding properties in one declaration |
|
|
Sets the bottom padding of an element |
|
|
Sets the left padding of an element |
|
|
Sets the right padding of an element |
|
|
Sets the top padding of an element |
CSS Dimension Properties
|
Property |
Description |
|
Sets the height of an element |
|
|
Sets the maximum height of an element |
|
|
Sets the maximum width of an element |
|
|
Sets the minimum height of an element |
|
|
Sets the minimum width of an element |
|
|
Sets the width of an element |
CSS Display/Visibility Properties
|
Property |
Description |
|
Specifies how an element should be displayed |
|
|
Specifies whether or not an element should be visible |
CSS Float Properties
|
Property |
Description |
|
Specifies on which sides of an element where floating elements are not allowed to float |
|
|
Specifies whether or not an element should float |
|
|
Specifies what happens if content overflows an element’s box |
|
|
Specifies what to do with the left/right edges of the content if it overflows the element’s content area |
|
|
Specifies what to do with the top/bottom edges of the content if it overflows the element’s content area |
CSS Positioning Properties
|
Property |
Description |
|
Sets the bottom margin edge for a positioned box |
|
|
Clips an absolutely positioned element |
|
|
Specifies the type of cursor to be displayed |
|
|
Sets the left margin edge for a positioned box |
|
|
Specifies what happens if content overflows an element’s box |
|
|
Specifies what to do with the left/right edges of the content if it overflows the element’s content area |
|
|
Specifies what to do with the top/bottom edges of the content if it overflows the element’s content area |
|
|
Specifies the type of positioning for an element |
|
|
Sets the right margin edge for a positioned box |
|
|
Sets the top margin edge for a positioned box |
|
|
Sets the stack order of an element |
Photoshop : Creating 3D Objects and Environments
Intro to Three Dimensional Space
Three dimensional (3D) space is what we experience on a daily basis in real life. Unlike two-dimensional (2D) photographs and drawings on a flat picture plane, three dimensional space occupies a third dimension of depth. Both 2D and 3D space utilize the x-axis (horizontal plane) and the y-axis (vertical plane), but only 3D space utilizes the x-axis (depth plane).
When using perfect geometry, these three planes can be viewed in separate, flat 2D views referred to as “orthographic” or “orthogonal” views. For instance, a 3D object can have a top, bottom, left, right, front, and back view that give us an idea how something will look from specific angles. It is common for 3D software to provide both interactive (3D and orthographic 2D) views of the objects in the 3D space so that the designer can better visualize what s/he is working with.
Basic Photoshop 3D Tools
3D Workspace
First, when you use 3D tools in Photoshop, it is extremely beneficial to switch to the 3D Workspace. To do so, go to Window > Workspace >3D. This will give you access to all of the panels that you will frequently need while modifying your objects.
Layers Panel
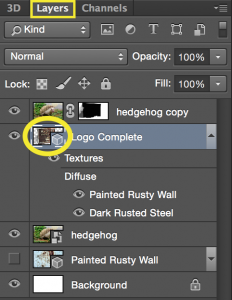
The Layers panel will still be available, and other options in some panels will change depending on which layer you have selected. Once you have changed a layer’s contents into a 3D mesh or extrusion, you will see a little cube shape appear in the layer’s thumbnail.
3D Panel
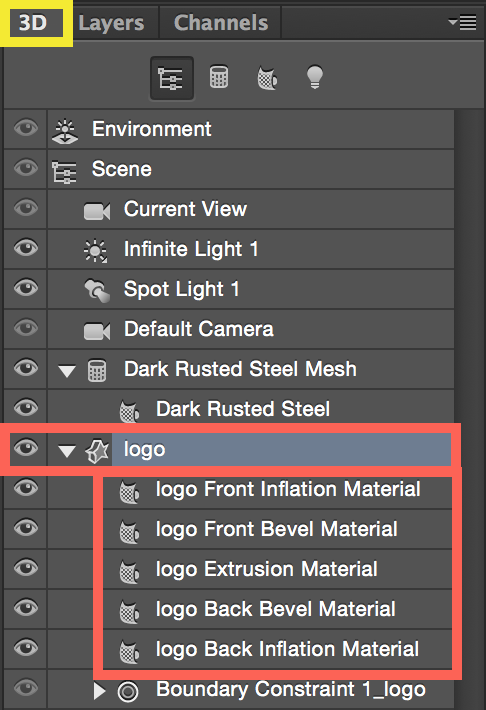
The 3D Panel is crucial in working with 3D objects in Photoshop. In this screenshot example, a 3D extrusion called “logo” is selected so that it can be manipulated. Notice that the “logo” is made up of materials, or meshes, in the drop-down menu below. These extrusion edges create the faces of the 3D object.
Properties Panel
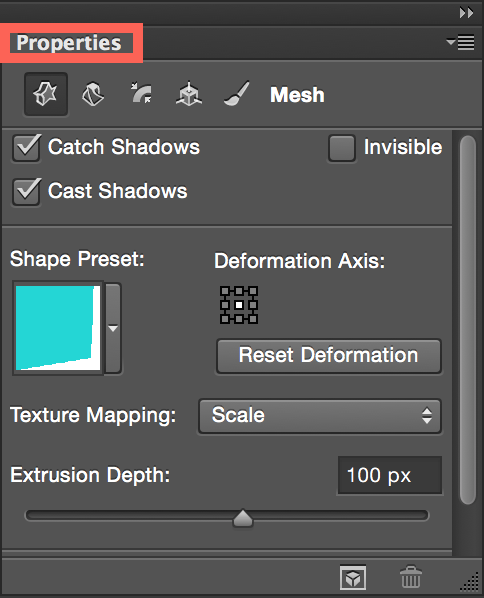
The Properties Panel will make different properties available relative to the object that is currently selected in the 3D Panel. Depending on the object selected, you might see completely different property options appear in the Properties Panel. The example below is displaying properties based on the “logo” extrusion’s selection in the 3D Panel illustrated above.
Moving 3D Objects in Photoshop

To move 3D objects in Photoshop, you need to first select the traditional Move Tool in the normal Tools Panel.
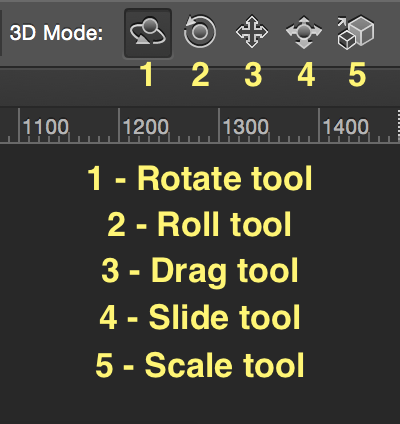
Once you have made that tool selection, you will see the tool options in the Options Panel change. If you have also selected a 3D object in the 3D Panel or in the Layers Panel, then the Move Tool’s options will also give you 3D Options. These 3D options are as follows: Rotate, Roll, Drag, Slide, and Scale. View the screenshot below to see what these tool icons look like.
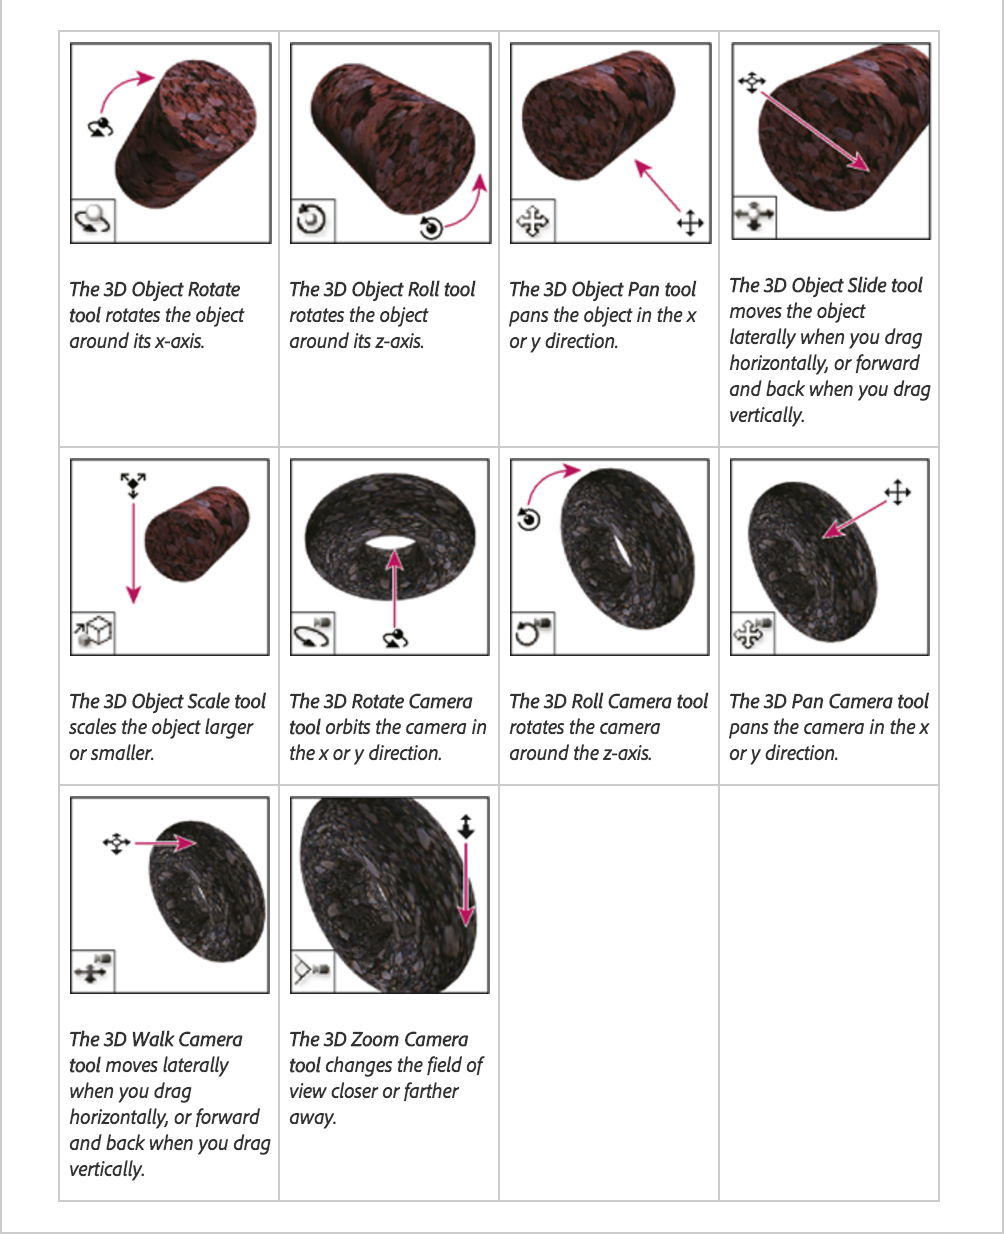
To read more about Adobe’s 3D tools and space, you can read their Essential 3D Concepts page.
For a very quick overview tutorial using Photoshop’s 3D tools, you can watch a short tutorial on creating 3D models.
Instructor Tutorial
For a more in-depth tutorial on how to create a more complex scene, you will see how to do the following:
- Setting up the basic scene elements
- Creating 3D “Postcard” Mesh to use as a mapped material
- Creating 3D “Postcard” Mesh to use as an object in space
- Creating 3D extruded object
- Creating and mapping custom materials to objects
- Moving object to the ground plane
- Merging 3D objects
- Setting up different types of light sources
- Using move and scale tools to manipulate the scene
- Placing 3D objects into a photographic environment to look natural
- Rendering and output
Playlist of 6 videos (~67minutes total)
If you want to follow along, you can download the 3D Photoshop Demo Starter Files.
Understanding Audio
How do audio files work?
To better understand how audio files work, let’s look at some basics about how sound works in general.
Starting with a vibration
Every sound is created through vibrations called sound waves. We typically hear them though air conductivity (waves traveling through air and through our ear canals), but we can also hear them through solid materials and through bone conductivity (solid vibrations against skull to ear bones). In fact, sound often travels more efficiently through solids than through air. For example, have you ever noticed that sounds are much louder (albeit less distinct) under water? If you ever wondered why people put their ears against a door to ‘hear through it,’ this is why. Also, if you think about how loud brushing your teeth sounds when you are doing it vs. someone else doing it, it is because the the bones in your head conduct the sound better than the air waves.
Examining the Waveform
Sound waves can be analyzed through a visual representation called a waveform. Any time you edit sound or look at it on a timeline when editing in a digital application, you will likely be provided with a waveform that gives you visual information about what is happening in the sound file.

To understand what is happening in a waveform, let’s look at wavelength, frequency, and amplitude.
- wavelength
- the distance between one crest to the next crest in a sound wave.
- frequency
- Frequency is measure of complete wavelength cycles in a second (cycles per second, or ‘cps’). The name of this unit of measure is more commonly called hertz (Hz), named after the scientist who discovered frequency. You look at frequency horizontally across a waveform.
- pitch
- The perceived ‘pitch’ of a sound is how animals interpret frequency between the physical apparatus of ears to the interpretive brain. They are not the same thing, as is often assumed.
- amplitude
- Amplitude is the measure of positive or negative change in atmospheric pressure caused by sound waves. It can be measured in the amount of force applied over an area. For instance, striking percussion harder creates a louder sound. Low amplitude sounds are quiet, while high amplitude sounds are loud. Think of an “amplifier” that is used to increase the volume of a musical instrument. It increases the intensity of sound using energy to increase the oscillations in electric current.
Visual Aids

Compare to:
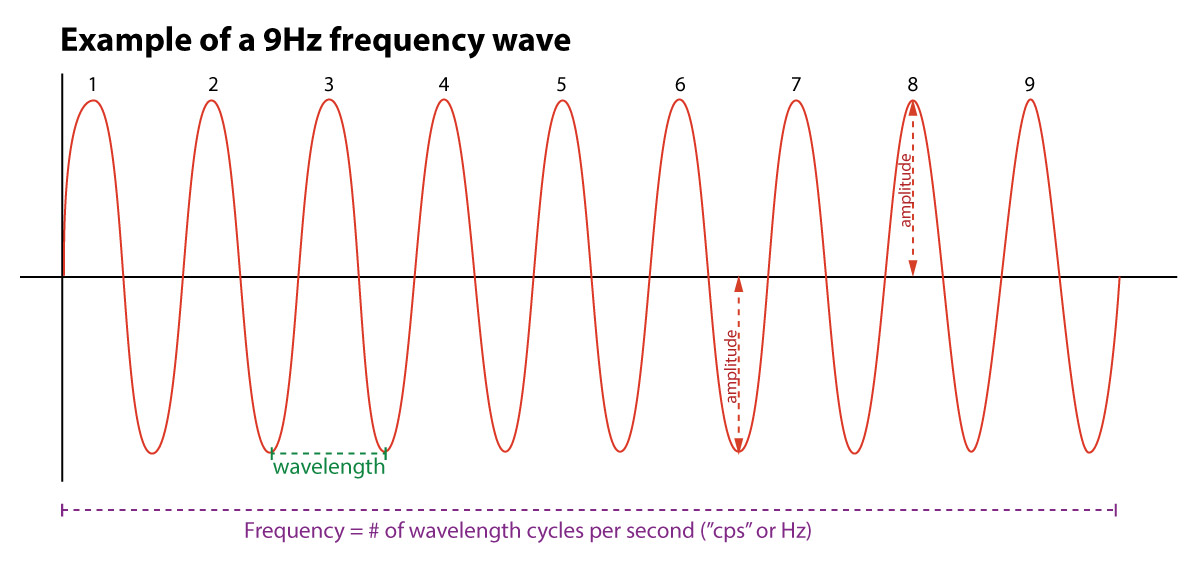
Notice how both examples above show the same amount of time duration on the timeline: 1 second. The 4Hz wave has 4 wavelengths per second, where the 9Hz wave has 9 wavelengths per second.
Digital Sound Terms
- sample size
- Measures the amplitude or strength of the signal. This is the vertical resolution of the scan of the signal. The sample rate is often measured in bits and determines “bit depth.” Typical CD-quality audio is recorded at a 16-bit sample size, which is 65,536 values or 216 power.
- sample rate
- The number of samples of sound recorded per second of time. This is the horizontal resolution of the sound over time. Typical CD-quality audio is 44,100 (44kHz) samples per second.
- bit rate
- The sample size and the sample rate together make up the unit of measure known as the “bit rate.” This total amount of digitized information is usually measured in bits per second. It can be thought of as:
-
…how much data per second is required to transmit the file, which can then be translated into how big the file is.
- -excellent article on Teakheadz.com
Audacity Software Tutorial
Audacity is a great free sound editor available on Mac, PC, and Linux platforms. It is very intuitive and easy to use. To read m4a files recorded
How do audio files work?
To better understand how audio files work, let’s look at some basics about how sound works in general.
Starting with a vibration
Every sound is created through vibrations called sound waves. We typically hear them though air conductivity (waves traveling through air and through our ear canals), but we can also hear them through solid materials and through bone conductivity (solid vibrations against skull to ear bones). In fact, sound often travels more efficiently through solids than through air. For example, have you ever noticed that sounds are much louder (albeit less distinct) under water? If you ever wondered why people put their ears against a door to ‘hear through it,’ this is why. Also, if you think about how loud brushing your teeth sounds when you are doing it vs. someone else doing it, it is because the the bones in your head conduct the sound better than the air waves.
Examining the Waveform
Sound waves can be analyzed through a visual representation called a waveform. Any time you edit sound or look at it on a timeline when editing in a digital application, you will likely be provided with a waveform that gives you visual information about what is happening in the sound file.

To understand what is happening in a waveform, let’s look at wavelength, frequency, and amplitude.
- wavelength
- the distance between one crest to the next crest in a sound wave.
- frequency
- Frequency is measure of complete wavelength cycles in a second (cycles per second, or ‘cps’). The name of this unit of measure is more commonly called hertz (Hz), named after the scientist who discovered frequency. You look at frequency horizontally across a waveform.
- pitch
- The perceived ‘pitch’ of a sound is how animals interpret frequency between the physical apparatus of ears to the interpretive brain. They are not the same thing, as is often assumed.
- amplitude
- Amplitude is the measure of positive or negative change in atmospheric pressure caused by sound waves. It can be measured in the amount of force applied over an area. For instance, striking percussion harder creates a louder sound. Low amplitude sounds are quiet, while high amplitude sounds are loud. Think of an “amplifier” that is used to increase the volume of a musical instrument. It increases the intensity of sound using energy to increase the oscillations in electric current.
Visual Aids

Compare to:

Notice how both examples above show the same amount of time duration on the timeline: 1 second. The 4Hz wave has 4 wavelengths per second, where the 9Hz wave has 9 wavelengths per second.
Digital Sound Terms
- sample size
- Measures the amplitude or strength of the signal. This is the vertical resolution of the scan of the signal. The sample rate is often measured in bits and determines “bit depth.” Typical CD-quality audio is recorded at a 16-bit sample size, which is 65,536 values or 216 power.
- sample rate
- The number of samples of sound recorded per second of time. This is the horizontal resolution of the sound over time. Typical CD-quality audio is 44,100 (44kHz) samples per second.
- bit rate
- The sample size and the sample rate together make up the unit of measure known as the “bit rate.” This total amount of digitized information is usually measured in bits per second. It can be thought of as:
-
…how much data per second is required to transmit the file, which can then be translated into how big the file is.
- -excellent article on Teakheadz.com
Audacity Software Tutorial
Audacity is a great free sound editor available on Mac, PC, and Linux platforms. It is very intuitive and easy to use. To read m4a files recorded by a variety of devices (including iPhones), you need the ffmpeg plugin. The ffmpeg extensions can be downloaded from our Canvas class OR from the source: https://lame.buanzo.org/.
Protected: MAT-210 Project Music Clips
WordPress – Introduction
This set of video lessons explain how the WordPress WebCMS works, how it interacts with server and client, and an overview of installation options.
WordPress Introduction Part 1 (11:31)
Continue reading WordPress – Introduction
PHP – Adding Functions to Your Template
This demonstration series will show you how you can create and include a ‘functions.php’ external file to your Project1 template.
Specifically, you will learn how to create and implement a script as a user-defined function that dynamically names the following on all the pages:
- <title></title>
- the banner area’s <h2></h2>
- a class/ID name to be used wherever you wish
- <img> source file and its alt text
You will see how to implement it by declaring the function in an external ‘functions.php’ file, including the ‘functions.php’ file inside the ‘head.inc.php’ file, and also calling the function inside the ‘head.inc.php’ file so that you can use its global scope variables anywhere within the template’s component pages.
Lastly, the demo also explains the difference between echoing the function’s results vs. using the stored variable values generated by a function from an external include() page.
JS – Project1 – Mobile JS Menu (+ more)
This demo series will show you how you can make your navigation mobile friendly and accessible using jQuery whether javascript is enabled on the client-side or not.
JS Mobile Menu Demo Series
This series is approximately 45 minutes long. You should expect it to take at least twice that time to do complete the work.
1 – Menu setup (18min)
2 – jQuery setup and custom script (17min)
3 – Styling the menu for proper behavior (13min)


