Category Archives: Software

Black Box Communication Study

Communication and Meaning Study / Assignment

Consists of in-class study + expanded homework graded assignment


Quick links on this page:


Objectives

Initial Study Objective

Use the Elements and Principles of Design to convey concept within strict formal constraints.

Final Refinement Objective

Develop the concept into a single, refined finished piece, effectively adding typography, color, and graphics enhance conceptual communication.


^ TOP MENU ^

In-Class Study Instructions

Using only 4 FLAT BLACK SQUARES within a square canvas you create a graphic that will visually convey the following:

  1. ORDER
  2. BOLD
  3. CONGESTION
  4. TENSION
  5. 
PLAYFUL 

Illustrator document Setup

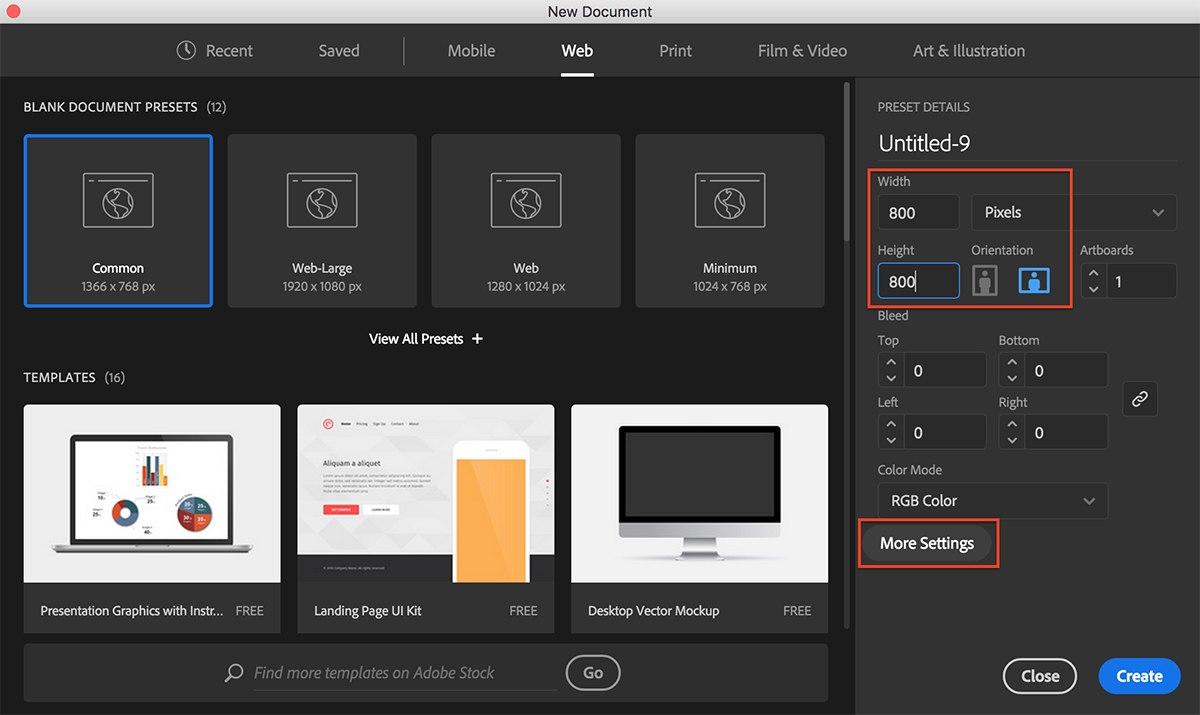
  1. Make a folder called “bb-communication-study”. Create a new Illustrator document at 800px X 800px.
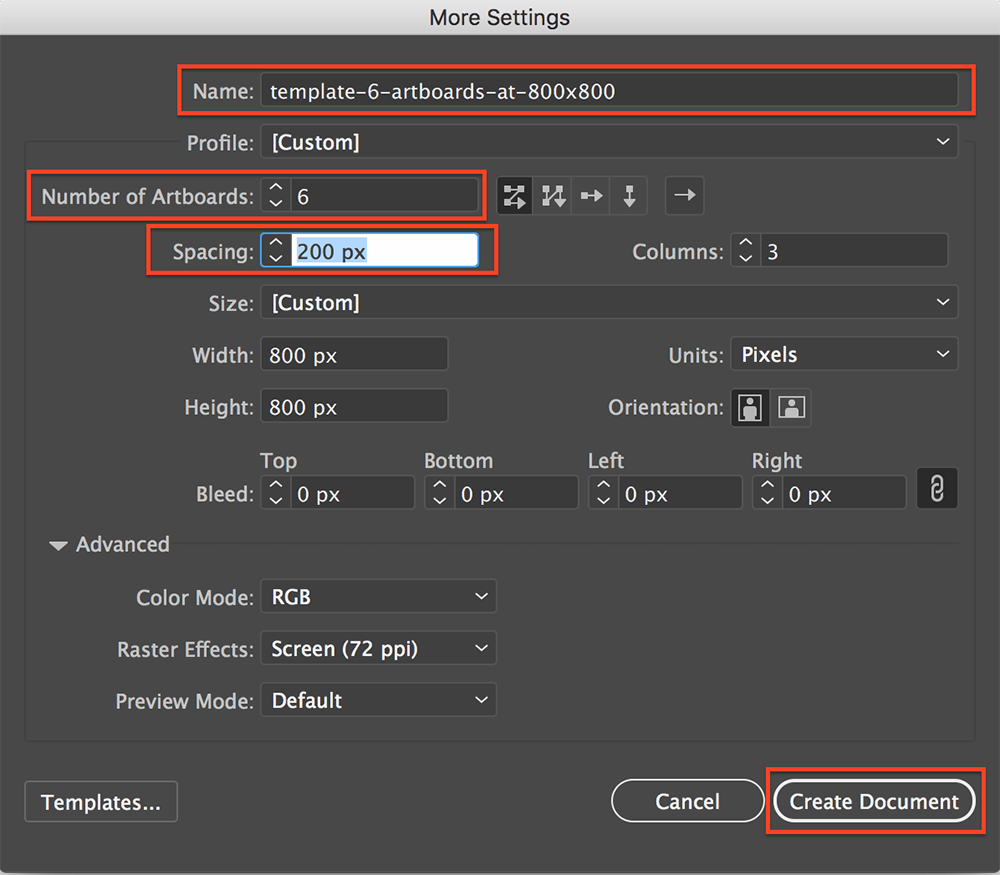
    •  illustrator doc setup 
  2. Click the “More Options” button to increase the number of artboards to 6, and title the document “template-6-artboards-at-800×800”.

    • more options for artboards 
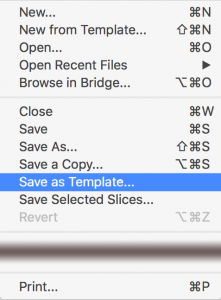
  3. Once it opens the new file, save it as a template. It will append “.ait” at the end of the filename.  
    • save as template 
  4. Next, do a “File >Save As” command and give it the name of the word you want to start with, such as “order-yourlastname.ai”.

Next: Arranging the Squares into Compositions

  1. On at least FOUR artboards, create different compositions using only black boxes that depict the given word.
    • You can modify scale and the box arrangements, including overlapping shapes and extending beyond the picture plane.
    • You can also add a white stroke if you wish, as well as adjusting the stroke size if so desired.
    • You can do up to 6 compositions as long as you don’t take more than 10 minutes per word total.
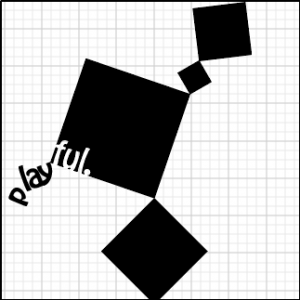
    • For reference, here are some examples of the word “playful
    •  
  2. HINT: It will serve you well to make a new layer for each composition so that your vector objects stay well-organized. This will be helpful later. To avoid accidentally adding objects to the wrong layers, lock the layers you want to avoid using.
    • Illustrator file layers 
  3. Save that file and close it.
  4. Repeat the process for each additional word by doing the following:
    • choose “File > New from Template,”
    • select the “template-6-artboards-at-800×800.ait” template you made,
    • save it as the next word (ex: “playful-yourlastname.ai”),
    • make your six new compositions,
    • Close and repeat this process until you are finished.
  5. Don’t spend more than 10 minutes on each word (or 50min total).

Uploading for In-Class Critique

Once you have finished making arrangements for each word, open all of the saved files so that you can review the compositions and decide which one is your favorite for each word. For each file, do the following:
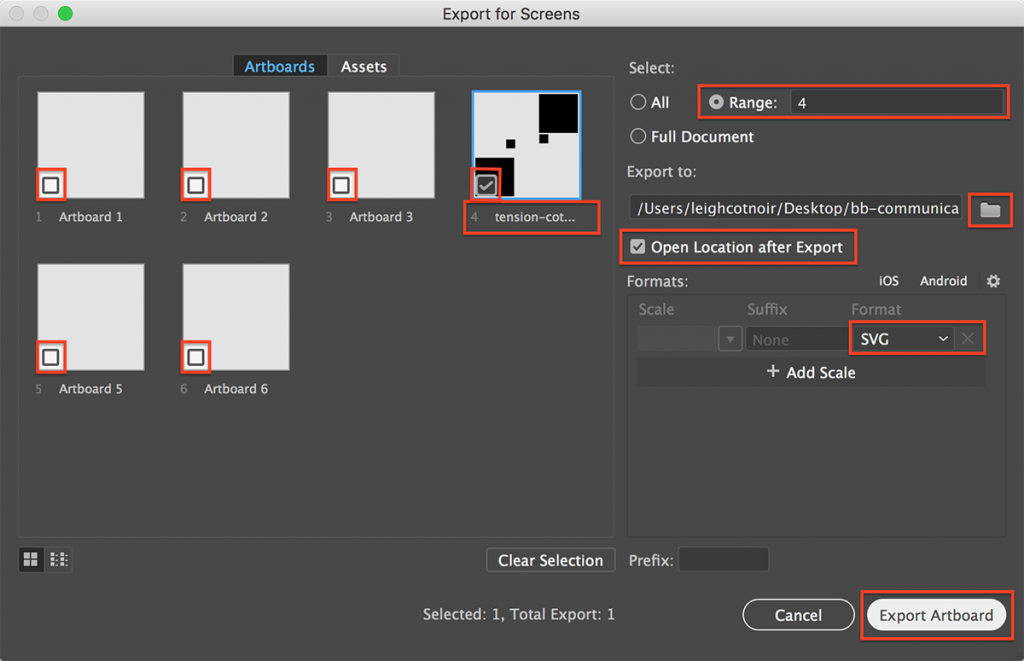
 export for screens
Refer to this screenshot example to follow instructions below.
  1. go to “Export > Export for Screens”,
  2. isolate your favorite artboard for the word by deselecting the other artboards,
  3. double-click the artboard name and rename it (eg. “tension-yourlastname”)
  4. choose where you want to save the file under “Export to:” by clicking the folder icon,
  5. select the desired export file types (SVG = scalable vector graphic)
  6. Click “Export Artboard.

Once you have done this for each one, be sure that the resulting filenames use the correct naming convention (eg. “tension-yourlastname.svg) with the word BEFORE your last name. Then upload all of them to the folder specified by the instructor.


^ TOP MENU ^

HOMEWORK ASSIGNMENT REFINEMENT

After you have completed the studies above, select the single composition you feel is the most successful of your 20 digital sketch iterations. That means you’ll only choose one composition from one word to work with.

1 : Setting up a new artboard in AI

Before embellishing the selected composition in your Illustrator file, you should duplicate the artboard. Open the word file for the comp you have selected, such as “playful-lastname.ai”, and create a new artboard that is 800px X 800px.

  1. Copy all of the contents of the chosen comp,
  2. Select the newly created artboard by clicking on it,
  3. Create a new layer in the Layers panel, and while the that layer is selected along with the new artboard, go to “Edit > Past In Place.” This will place a duplicate set of objects in your new artboard and within a new layer so that you can keep track of your original design iteration.
  4. Lock the other layers not in use and continue.

2: Add Typography

You will first add typography to the piece based on the communication you want to have, including the word you are portraying. Spend time truly exploring a range of type. Do not simply settle on a face after looking at type for only 10 minutes. Selecting appropriate fonts takes time. If you do not have a good selection of fonts on your computer, explore free, downloadable Google Fonts, as well as other free fonts from websites like DaFont.

If you want a primer on using the Google Fonts tools, you can watch the following video demonstration:

Add typography in the form of your word (or a slightly modified version of it if it suits you), playing with font style (regular, bold, condensed, etc.), scale, placement, letter-spacing, and even the letterforms if it makes sense. To modify actual letterforms (shapes of the letters), you will need to convert the type into vector shapes by selecting the text and going to “Type > Create Outlines.” After doing this you can individually modify the anchor points with the white arrow tool (“Direct Selection Tool).

When you find a solution that might work, duplicate your work into a new artboard and layer iteration to continue experimenting. Keep track of every iteration through the artboard process so that you have a record of your design evolution and explorations.

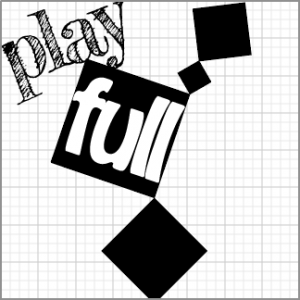
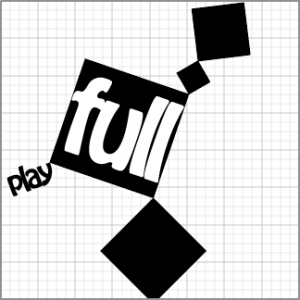
The examples below use both the actual word, “playful”, as well as word play on two words, “play” and “full”:

3: Add imagery

Once you have started exploring the addition of typography with at least a couple of iterations, create a new artboard that allows you to add imagery. To add images properly in an Illustrator file, use the “File > Place” menu command. You should download, move, or make a copy of the original image file(s) inside the same folder in which the Illustrator file resides. This is because files are LINKED to one another in Illustrator, not embedded. If you don’t do this, you will very likely lose the image when transporting your files from one computer to another (including turning work in for evaluation).

When selecting imagery, steer clear of trite or predictable memes. Try to think outside the box (no pun intended).

To fully explore the best range of possibilities, you must make a minimum of 8 iterations of the selected study composition with typography and imagery. Evidence of all iterations must be present in your AI file for full credit.

Example iterations (hover for descriptions of changes):

4 : Completing and turning in the assignment

  1. When complete, you need to go to “File > Package” to create a folder that has all assets and fonts necessary for the instructor to grade your work and for you to be certain you aren’t missing any asset files or specialty fonts. 
  2. Next, use “File > Export > Export for Screens” to archive your artboards as jpg or png files so that you have rasterized versions of the images. Save them into your packages folder.
  3. Finally, upload your work to the server in the location designated in class by the instructor when finished.

^ TOP MENU ^


Animate CC – The Basics + Basic Video Project

Tutorials for Learning Basic Animate CC Skills + Collaborative Project Techniques

This set of tutorials is geared toward helping students complete the second project for MAT-120, but it can still be used by others to learn specific skills using Animate CC (formerly calledFlash Professional). Below is an outline of what you will find in the tutorials. Some students might be able to skip some lessons based on their current knowledge of certain tools and concepts.

Continue reading Animate CC – The Basics + Basic Video Project

WordPress Installation and Backup in cPanel Class Server

A Web Developer’s Process

While there are simple single-click installation options on most servers nowadays for installing WordPress, these obfuscate important details of the installation process that you should understand.Using single-click installations without knowing how the application really works is dangerous if you become dependent upon a site and later cannot properly maintain, backup, restore, and repair it when it breaks.

It is incumbent upon you as a designer-developer and webmaster to truly understand all the ins-and-outs of how WordPress works, troubleshooting WP, managing the files and database, and ensuring that you always have full backups at all times and know how to restore them. 

That being said, below are tutorials laid out in distinct phases that will help you understand all of the important steps in installing and backing up a WordPress site….


Full Video Playlist


Build Your First WordPress Self-Hosted Site

WordPress Basics

The playlist of video tutorials on this page will walk you through the steps necessary for understanding the basic organization of WordPress’ content entry options, plugins, themes, and settings. Furthermore, it addresses content strategy, navigation strategy, how to begin understanding what should be a post vs. a page, how to create and publish the content, and how to decide on a theme that’s right for your needs.

Below are two sections:

  1. where you can either access individual video links from the playlist, seeing the specific topics covered in each
  2. the full playlist

View Full Playlist Here:


Photoshop: Using Blend-If for Video

How To Get a Green Screen Effect In Photoshop

The video demo below will show you how you can use the “Blend-If” layer blending mode option to chromakey out ranges of color from a video file in the video timeline. This is the closest Photoshop currently comes to having a “green screen” effect (as of 2016) on moving videos.

Photoshop : Creating 3D Objects and Environments

Intro to Three Dimensional Space

Three dimensional (3D) space is what we experience on a daily basis in real life. Unlike two-dimensional (2D) photographs and drawings on a flat picture plane, three dimensional space occupies a third dimension of depth. Both 2D and 3D space utilize the x-axis (horizontal plane) and the y-axis (vertical plane), but only 3D space utilizes the x-axis (depth plane).

When using perfect geometry, these three planes can be viewed in separate, flat 2D views referred to as “orthographic” or “orthogonal” views. For instance, a 3D object can have a top, bottom, left, right, front, and back view that give us an idea how something will look from specific angles. It is common for 3D software to provide both interactive (3D and orthographic 2D) views of the objects in the 3D space so that the designer can better visualize what s/he is working with.

Basic Photoshop 3D Tools

3D Workspace

First, when you use 3D tools in Photoshop, it is extremely beneficial to switch to the 3D Workspace. To do so, go to Window > Workspace >3D. This will give you access to all of the panels that you will frequently need while modifying your objects.

Layers Panel

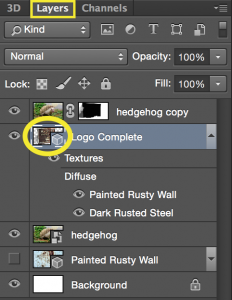
Layers Panel with 3D layer selected

The Layers panel will still be available, and other options in some panels will change depending on which layer you have selected. Once you have changed a layer’s contents into a 3D mesh or extrusion, you will see a little cube shape appear in the layer’s thumbnail.

3D Panel

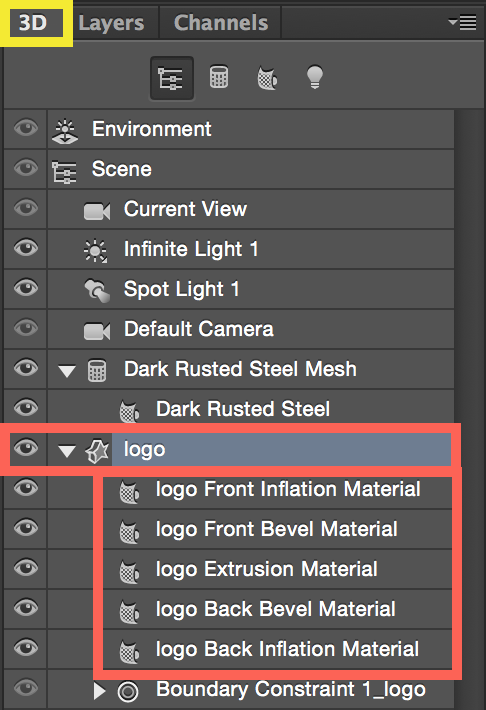
3D Panel with extrusion selected

The 3D Panel is crucial in working with 3D objects in Photoshop. In this screenshot example, a 3D extrusion called “logo” is selected so that it can be manipulated. Notice that the “logo” is made up of materials, or meshes, in the drop-down menu below. These extrusion edges create the faces of the 3D object.

Properties Panel

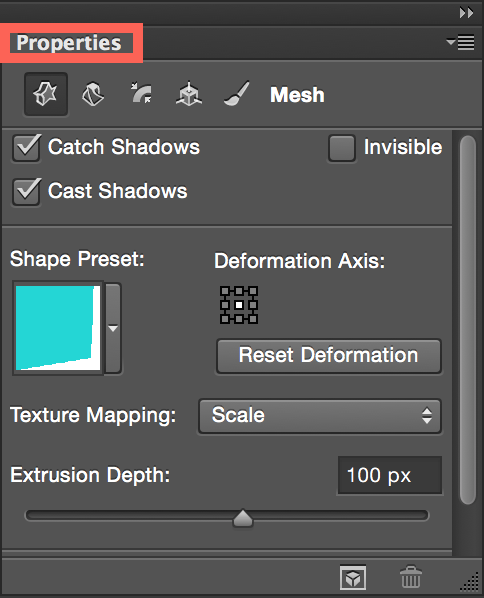
The Properties Panel will make different properties available relative to the object that is currently selected in the 3D Panel. Depending on the object selected, you might see completely different property options appear in the Properties Panel. The example below is displaying properties based on the “logo” extrusion’s selection in the 3D Panel illustrated above.

3D Properties Panel relative to selected item

Moving 3D Objects in Photoshop

Standard Photoshop Move Tool

To move 3D objects in Photoshop, you need to first select the traditional Move Tool in the normal Tools Panel.

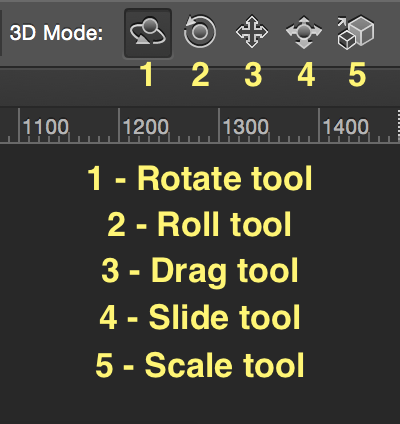
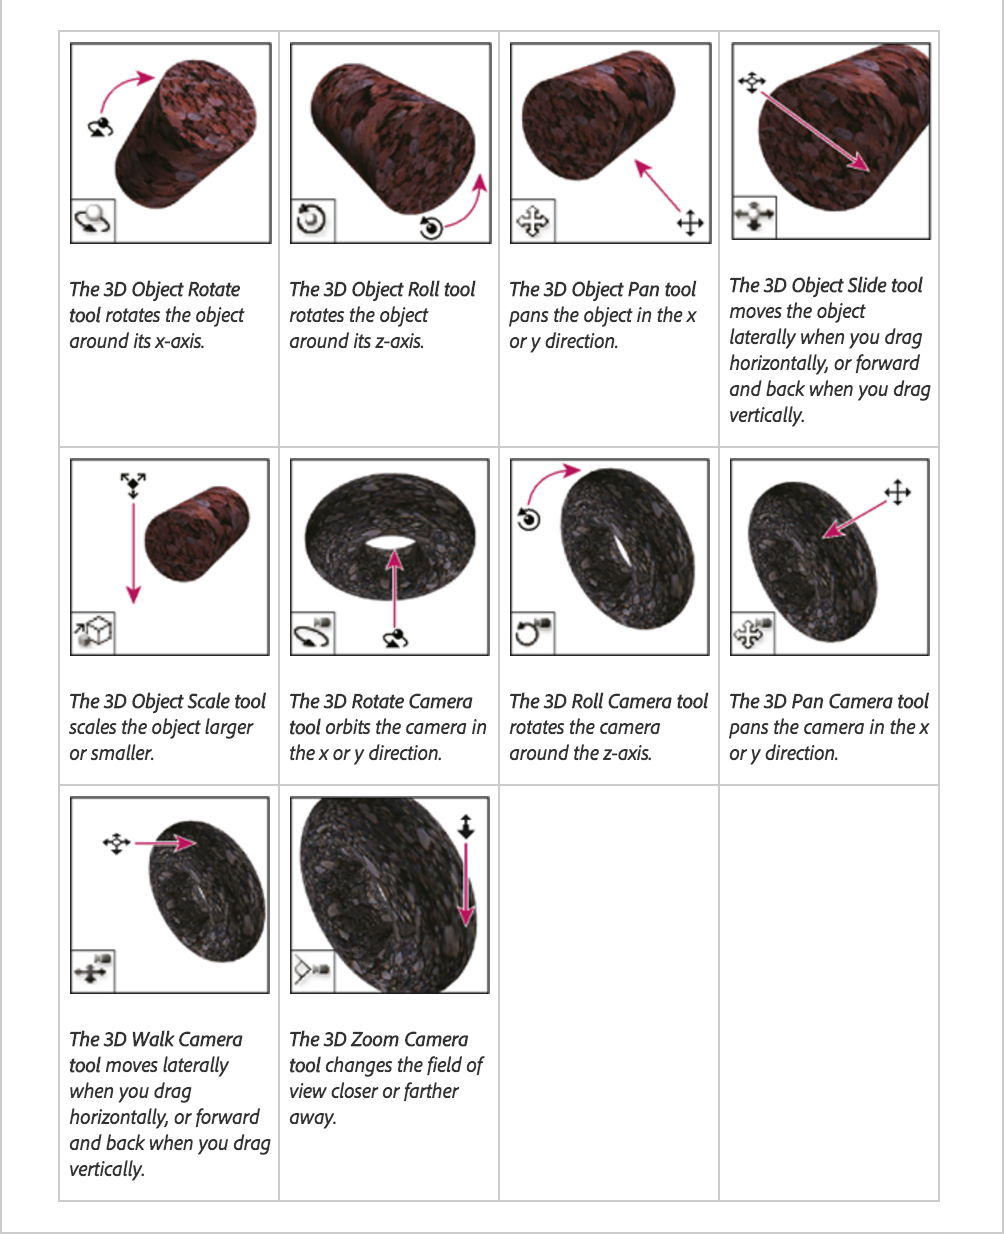
Once you have made that tool selection, you will see the tool options in the Options Panel change. If you have also selected a 3D object in the 3D Panel or in the Layers Panel, then the Move Tool’s options will also give you 3D Options. These 3D options are as follows: Rotate, Roll, Drag, Slide, and Scale. View the screenshot below to see what these tool icons look like.

3D Move Tool Options
Photoshop move and scale 3D tools
Photoshop 3D move and scale tools, from: https://helpx.adobe.com/photoshop/using/tools.html

To read more about Adobe’s 3D tools and space, you can read their Essential 3D Concepts page.

For a very quick overview tutorial using Photoshop’s 3D tools, you can watch a short tutorial on creating 3D models.

Instructor Tutorial

For a more in-depth tutorial on how to create a more complex scene, you will see how to do the following:

  • Setting up the basic scene elements
  • Creating 3D “Postcard” Mesh to use as a mapped material
  • Creating 3D “Postcard” Mesh to use as an object in space
  • Creating 3D extruded object
  • Creating and mapping custom materials to objects
  • Moving object to the ground plane
  • Merging 3D objects
  • Setting up different types of light sources
  • Using move and scale tools to manipulate the scene
  • Placing 3D objects into a photographic environment to look natural
  • Rendering and output

Playlist of 6 videos (~67minutes total)

If you want to follow along, you can download the 3D Photoshop Demo Starter Files.


Understanding Audio

How do audio files work?

To better understand how audio files work, let’s look at some basics about how sound works in general.

Starting with a vibration

Every sound is created through vibrations called sound waves. We typically hear them though air conductivity (waves traveling through air and through our ear canals), but we can also hear them through solid materials and through bone conductivity (solid vibrations against skull to ear bones). In fact, sound often travels more efficiently through solids than through air. For example, have you ever noticed that sounds are much louder (albeit less distinct) under water? If you ever wondered why people put their ears against a door to ‘hear through it,’ this is why. Also, if you think about how loud brushing your teeth sounds when you are doing it vs. someone else doing it, it is because the the bones in your head conduct the sound better than the air waves.

Examining the Waveform

Sound waves can be analyzed through a visual representation called a waveform. Any time you edit sound or look at it on a timeline when editing in a digital application, you will likely be provided with a waveform that gives you visual information about what is happening in the sound file.

Waveform Example
Waveform Example

To understand what is happening in a waveform, let’s look at wavelength, frequency, and amplitude.

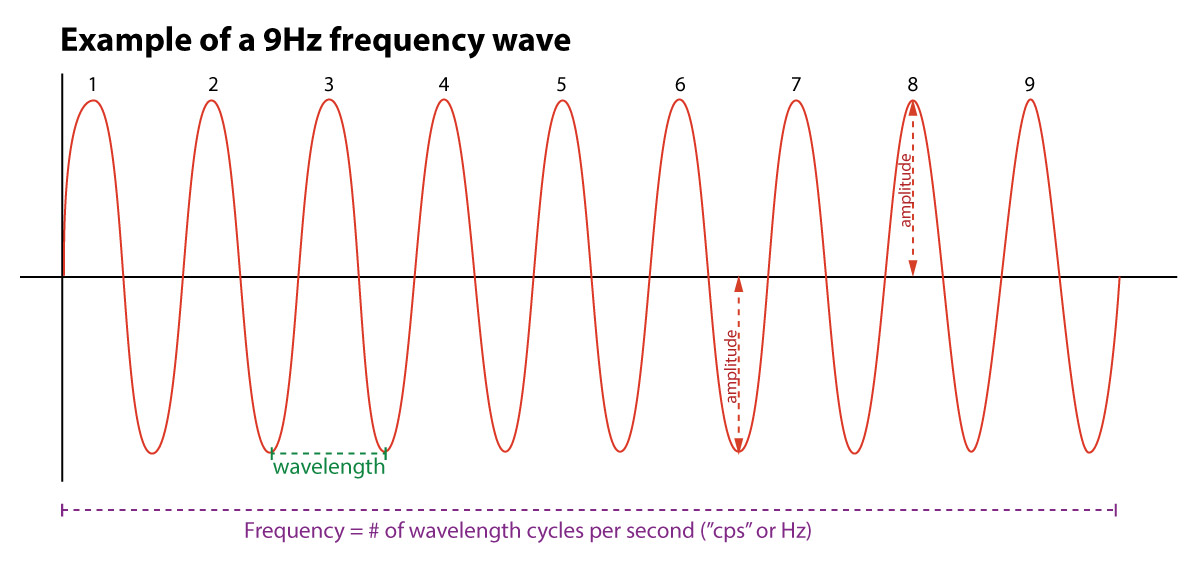
wavelength
the distance between one crest to the next crest in a sound wave.
frequency
Frequency is measure of complete wavelength cycles in a second (cycles per second, or ‘cps’). The name of this unit of measure is more commonly called hertz (Hz), named after the scientist who discovered frequency. You look at frequency horizontally across a waveform.
pitch
The perceived ‘pitch’ of a sound is how animals interpret frequency between the physical apparatus of ears to the interpretive brain. They are not the same thing, as is often assumed.
amplitude
Amplitude is the measure of positive or negative change in atmospheric pressure caused by sound waves. It can be measured in the amount of force applied over an area. For instance, striking percussion harder creates a louder sound. Low amplitude sounds are quiet, while high amplitude sounds are loud. Think of an “amplifier” that is used to increase the volume of a musical instrument. It increases the intensity of sound using energy to increase the oscillations in electric current.

Visual Aids

Waveform Example with 4Hz frequency


Compare to:

Waveform Example with 9Hz frequency

Notice how both examples above show the same amount of time duration on the timeline: 1 second. The 4Hz wave has 4 wavelengths per second, where the 9Hz wave has 9 wavelengths per second.

Digital Sound Terms

sample size
Measures the amplitude or strength of the signal. This is the vertical resolution of the scan of the signal. The sample rate is often measured in bits and determines “bit depth.” Typical CD-quality audio is recorded at a 16-bit sample size, which is 65,536 values or 216 power.
sample rate
The number of samples of sound recorded per second of time. This is the horizontal resolution of the sound over time. Typical CD-quality audio is 44,100 (44kHz) samples per second.
bit rate
The sample size and the sample rate together make up the unit of measure known as the “bit rate.” This total amount of digitized information is usually measured in bits per second. It can be thought of as:

…how much data per second is required to transmit the file, which can then be translated into how big the file is.

-excellent article on Teakheadz.com

Audacity Software Tutorial

Audacity is a great free sound editor available on Mac, PC, and Linux platforms. It is very intuitive and easy to use. To read m4a files recorded

How do audio files work?

To better understand how audio files work, let’s look at some basics about how sound works in general.

Starting with a vibration

Every sound is created through vibrations called sound waves. We typically hear them though air conductivity (waves traveling through air and through our ear canals), but we can also hear them through solid materials and through bone conductivity (solid vibrations against skull to ear bones). In fact, sound often travels more efficiently through solids than through air. For example, have you ever noticed that sounds are much louder (albeit less distinct) under water? If you ever wondered why people put their ears against a door to ‘hear through it,’ this is why. Also, if you think about how loud brushing your teeth sounds when you are doing it vs. someone else doing it, it is because the the bones in your head conduct the sound better than the air waves.

Examining the Waveform

Sound waves can be analyzed through a visual representation called a waveform. Any time you edit sound or look at it on a timeline when editing in a digital application, you will likely be provided with a waveform that gives you visual information about what is happening in the sound file.

Waveform Example
Waveform Example

To understand what is happening in a waveform, let’s look at wavelength, frequency, and amplitude.

wavelength
the distance between one crest to the next crest in a sound wave.
frequency
Frequency is measure of complete wavelength cycles in a second (cycles per second, or ‘cps’). The name of this unit of measure is more commonly called hertz (Hz), named after the scientist who discovered frequency. You look at frequency horizontally across a waveform.
pitch
The perceived ‘pitch’ of a sound is how animals interpret frequency between the physical apparatus of ears to the interpretive brain. They are not the same thing, as is often assumed.
amplitude
Amplitude is the measure of positive or negative change in atmospheric pressure caused by sound waves. It can be measured in the amount of force applied over an area. For instance, striking percussion harder creates a louder sound. Low amplitude sounds are quiet, while high amplitude sounds are loud. Think of an “amplifier” that is used to increase the volume of a musical instrument. It increases the intensity of sound using energy to increase the oscillations in electric current.

Visual Aids

Waveform Example with 4Hz frequency


Compare to:

Waveform Example with 9Hz frequency

Notice how both examples above show the same amount of time duration on the timeline: 1 second. The 4Hz wave has 4 wavelengths per second, where the 9Hz wave has 9 wavelengths per second.

Digital Sound Terms

sample size
Measures the amplitude or strength of the signal. This is the vertical resolution of the scan of the signal. The sample rate is often measured in bits and determines “bit depth.” Typical CD-quality audio is recorded at a 16-bit sample size, which is 65,536 values or 216 power.
sample rate
The number of samples of sound recorded per second of time. This is the horizontal resolution of the sound over time. Typical CD-quality audio is 44,100 (44kHz) samples per second.
bit rate
The sample size and the sample rate together make up the unit of measure known as the “bit rate.” This total amount of digitized information is usually measured in bits per second. It can be thought of as:

…how much data per second is required to transmit the file, which can then be translated into how big the file is.

-excellent article on Teakheadz.com

Audacity Software Tutorial

Audacity is a great free sound editor available on Mac, PC, and Linux platforms. It is very intuitive and easy to use. To read m4a files recorded by a variety of devices (including iPhones), you need the ffmpeg plugin. The ffmpeg extensions can be downloaded from our Canvas class OR from the source: https://lame.buanzo.org/.

CSS – Creating a Mobile-First Design Template

Creating a Mobile-First Design Template for Your PHP Project

This demo will give you guidance in styling a web page with HTML5 markup from a mobile-first design approach. It covers the following concepts, principles, and methods:

  • the php/html starter file’s proper markup
  • how to add Google Fonts to a design
  • using a viewport/device-width meta tag
  • removing native browser styling with a ‘reset’ css file
  • using @viewport and @-ms-viewport in CSS
  • designing for smallest screens in mind first
  • using @media queries to alter layout on larger screens
  • styling a baseline for very commonly used elements

To follow along with these videos using the exact same markup,  download the template ‘project1’ folder in a zipped file. After downloading, unzip and place the unzipped folder into your “htdocs/” folder to work on the files.

Creating a Mobile-First Responsive Site Template
(7-Part Video Demo Playlist BELOW)

Approximately 2.5 hours of demo. Expect the work you do to create your own base design template to take a minimum of 8 hours.

00 – Getting Started (19:37)
01 – Start Styling (27:49)
02 – Styling the Banner (24:46)
03 – Styling the Banner’s NAV (22:25)
04 – Styling the Baseline Content (20:53)
05 – Styling the Baseline Content (Continued 14:26)
06 – Styling the Footer / Using Additional Breakpoints (22:51)


Want to learn more about using Google Web Fonts?

Check this video out.


Useful Project Resources

XAMPP – TURN YOUR MAC INTO A DEVELOPMENT SERVER

Installing XAMPP on your MAC personal computer

XAMPP stands for “X (one of four OSs), Apache, MySQL, PHP, PERL” and is used to enable your personal computer with the web and database tools necessary to host its own dynamically driven websites for testing and development purposes. The following tutorial video demonstrations will show you the steps to set your computer up as a “localhost” server on a Mac. Continue reading XAMPP – TURN YOUR MAC INTO A DEVELOPMENT SERVER

XAMPP – Turn your PC into a development server

Installing XAMPP on your personal computer

XAMPP stands for “X (one of four OSs), Apache, MySQL, PHP, PERL” and is used to enable your personal computer with the web and database tools necessary to host its own dynamically driven websites for testing and development purposes. The following tutorial video demonstrations will show you the steps to set your computer up as a “localhost” server on Windows. Continue reading XAMPP – Turn your PC into a development server

MAMP – Turn your Mac into a development server

Installing MAMP on your personal computer

MAMP stands for “Mac Apache, MySQL, PHP” and is used to enable your personal computer with the web and database tools necessary to host its own dynamically driven websites for testing and development purposes. The following tutorial video demonstrations will show you the steps to set your computer up as a “localhost” server. Continue reading MAMP – Turn your Mac into a development server

Conceptual Space Project – Sample Work

The following project required students to pick a conceptual word from a list and create a visual composition created from 5 -6 different image sources. The final image needed to express the feeling or meaning of the word and depict a “believable” space in terms of depth-of-field, although it could exist in a surreal environment.

tree growing out of cracked dry earth
Redemption – Conceptual Space Project
Vacant - Conceptual Space Project
Vacant – Conceptual Space Project
rock face with opening
Whispering – Conceptual Space Project
Untroubled
Untroubled – Conceptual Space Project
Discordant
Discordant – Conceptual Space Project
Discordant
Discordant – Conceptual Space Project

Continue reading Conceptual Space Project – Sample Work