
Project1 : Web Mockup and Image Generation
18% of Semester Grade
Quick Links on this Page:
Overview
The Short Answer:
In this assignment, students will learn how to design professional visual presentation mockups for project layouts in Photoshop, with a focus on webpage layout design and image production.
The Longer Explanation:
While the emphasis of this assignment’s mockup type will specifically focus on webpage layout design and image production, most techniques addressed in the assignment also carry over to creating layouts for other types of design comps, visual rough drafts for projects, and workflow methods/tools/techniques in print media projects (with some exception to issues of resolution). Through this assignment’s process, students will learn how to successfully build professional grid-based design layouts, which is an important presentation skill for designers, artists, and marketing professionals alike. Furthermore, this exercise is critically skill-building, as it covers many core advanced tools and techniques that students will need to employ throughout the semester on other assignments, regardless of output type (web v. print).
Process
Part One:
Understand the overview of the process before beginning:
To do this assignment, you will need to follow the video lesson series for the “Photoshop Web Mockup.” The demonstrations in the series will take you through a step-by-step process teaching you how to create a web page design and produce resulting image assets optimized for the web.
Although you will likely want to follow the tutorial exactly to help avoid additional roadblocks in your process, you are required to ultimately substitute different images and create your own unique logo and branding for the final result that you turn in for a grade.
This means that after walking through the demo, you will need to envision a different client (a company, organization, or your own portfolio page), and at a minimum:
- replace the stock images I provide to you with new ones of your choice,
- change heading text as necessary for relevance to the content,
- design your own unique logo and company name for your selected “client,”
- change any other pertinent information on the page,
- and use your own color scheme.
While you are not required to change the grid-based layout, you may do so if you feel that your new client page needs additional (or fewer) components within each section.
NOTE: Because I am allowing students to work based off of the tutorial’s basic design framework, you are not required to produce your own unique sketches unless you change the wireframe layout to customize your own page. You are allowed to use the instructor’s demo “sketch” as your preliminary drawing template. This will make more sense once you start watching the video lessons.
Part Two:
Actually Getting Started
2a) Download the following zipped folder before starting the tutorial and unzip it on your Desktop:
Download “werner-mitchell-web.zip”
To unzip on a Mac, simply double click the file; to unzip on Windows, right-click the zipped file and select “Extract All” from the popup menu. You will use the newly produced “werner-mitchell-web” folder as your lesson folder to follow the tutorial. Inside of that folder you will see a file called “preliminary-sketch.jpg”, which you will need to use later in the tutorial as a template file in your PSD.
2b) Watch and follow along with the first playlist in the video series, which will begin at the introduction of our design process and take you through our branding logotype creation. By the end of these tutorials you will have produced the main logo badge that goes into the top part of the webpage.
Photoshop Web Mockup – Intro Though Logo Creation (~106 min, 6 videos):
FIRST, please note that some of these videos were produced before Adobe changed the icon for their Move Tool. See the differences below so you will not be confused. The Move Tool is found at the very top of the main Photoshop toolbar.
Your current Photoshop CC Move Tool: 
Old Move Tool in some of the videos: 
Videos in Playlist:
1 – Getting Started (12min)
2 – Resolution (20min)
3 – Creating Logo Typography (15min)
4 – Color Swatches (21min)
5 – Vector Shapes (15min)
6 – Logo Completion (12min)
Part Three:
Creating the Vector Wireframe
Do the tutorials in the following playlist:
Photoshop Web Mockup Wireframe Creation (~78 min, 5 videos):
IMPORTANT NOTE:
Since this video was recorded, I have since removed a video explaining how to use a plugin called “GuideGuide.” Photoshop has since adopted the functionality of GuideGuide, and they have incorporated it directly into Photoshop. To use Photoshop’s now-native guide layout tool, go to “View > New Guide Layout“. Any reference to “GuideGuide” can now be referred to in Photoshop’s native Guide Layout options.
Videos in this Playlist:
7 – Getting Started with Layout (15min)
8a – Guide Guide Installation <– removed.
8 – Setting up PSD Document (use “View > New Guide Layout” instead of GuideGuide) -(17min)
9 – Building Vector Wireframe PART 1 (15min)
10 – Building Vector Wireframe PART 2 (15min)
11 – Completing Vector Wireframe PART 3 (15min)
Your “New Guide Layout” panel should look like this when you set up your guides:

Resources for this section:
- Adobe video lesson on using Layer Comps in Photoshop (6min)
- Photoshop Artboards (4min) lessons on Adobe’s tutorial website
- Neither Layer Comps nor Artboards were not used in the instructor demonstrations for this assignment, but they would be extremely useful to students for this assignment’s purposes (ease of use and efficiency for students!)
NOTE: You will have completed the wireframe for the design by the completion of this section.
Part Four:
Turning the Wireframe Into a Mockup with Images
4a) First, download the ‘resource image files.zip’ file of image resources, place it into your ‘werner-mitchell-web’ folder, and unzip it. You will use these image resources in the next set of tutorials.
4b) Do the following lessons:
SUPER IMPORTANT UPDATE:
In VIDEO #13 below, I tell you to place your image using “File > Place Linked” before making any RAW adjustments, but it will save you a world of frustration if you instead first add the initial RAW image adjustments to the images in Bridge before placing the files. Watch the whole video first to see what we are generally doing, and then go back to do everything in this different order:
- Open Bridge and locate the image files in your project folder you intend to use in the mockup.
- In Bridge, follow the tutorial insofar as adding a RAW adjustment and experimenting within RAW. (start at 6:24 minute marker of video #13 and go till ~10:48 and stop)
- In Photoshop, add your images with “File > Place Linked” (start at beginning of Video #13)
- If you need to make additional RAW adjustments, do so through Bridge as I show in the video. The difference here is that the adjustments no longer automatically appear in PS 2019. Instead, to see RAW adjustment updates, you need to do this:
- NEW: Right-click the linked layer (not its thumbnail), and select “Relink to File.” This should update your RAW changes inside the PSD. You have to do that each time you make a raw change to the linked file.
NOTE: If you don’t add the RAW info to the linked image until after you’ve already linked it, it will change the scale of your linked file when you update via “Relink to File” the first time. It’s pretty buggy!
Photoshop Web Mockup – Adding Images (60min, 4 videos):
Videos in this Playlist:
12 – Prepping the PSD for Images (15min)
13 – Image Smart Objects and ACR (15min)
14 – Image Smart Objects and ACR Part 2 (15min)
15 – Image Smart Objects and ACR Part 3 (15min)
4c) Image resources:
4d) Additional resources pertinent to section FOUR:
- Extended Camera RAW tutorials on Adobe’s tutorial website
Part Five:
Generate Web Assets, Create Multiple Artboards/Layouts, and Learn How to Package a PSD
Wrap up the demo portion of the assignment with the following lessons:
Photoshop Web Mockup Generating Web Assets (55min, 3 videos):
Videos in this Playlist:
16 – Generating Web Asset Files Part 1 (13min)
17 – Generating Web Asset Files Part 2 (15min)
18 – Using Artboards and Learning how to ‘Package’ a Project in Photoshop (24min)
Section resources:
Photoshop Blog on layer naming codes for image generation: http://tinyurl.com/puod94f
Part Six:
Customize Your Design Before Packaging and Turning In
6a) Duplicate your ENTIRE “werner-mitchell-web” folder and give it a new name of “yourlastname-p1” (where ‘yourlastname’ is your last name. Also be sure to rename this folder’s PSD file to “yourlastname-p1.psd”.
6b) Use the newly duplicated folder file for customizing your design so that it has a unique brand with a color scheme, original vector logo you create, new images of your choice, and relevant/updated headings if necessary. At a minimum, you must still keep these elements (or a modified version of them):
Header section: Nav bar, Logo, background banner image (proportions can change, though)
“Who We Are” section: Although you can rename this section if you want, it needs to exist to tell the audience whose site it is and/or what they are about. It needs to maintain at least one gallery image representation and a blurb about the site. You can choose to modify this to make it look like a large image slider with side arrow navigation if you want to alter the section. Feel free to change background color, etc.
“Our Team” section: If you are changing the site so that “Our Team” no longer makes sense, think of how this section can be revised to make work with your new content focus. For instance, if you are redesigning the page as a personal one-page portfolio, this section could include skill icons/logos representing software proficiencies instead of having pictures of people (i.e. logos for Photoshop, Illustrator, Bridge, etc.). Be sure to update the background image with something new.
Contact Us: You need to keep a contact section, but if doing a portfolio page and you don’t want to put a map on there, you could consider replacing/resizing the map image with a picture of yourself. Be sure to update the background image with something new.
Social Media: You have two options. The first is that you can customize the text links to suit your “client’s” appropriate social media outlets and/or use appropriate social media icons instead of text. But if you decide you don’t want to include social media at all, this section can be retrofitted as a bottom navigational toolbar.
Footer: Keep this, but be sure to update the logo, etc.
***You will receive a dramatically reduced grade for the assignment if you simply turn in the design files reflecting the “werner-mitchell” brand tutorials.
Part Seven (Turn In):
How to Prep Final Files, What to Turn In, and Where to Turn In
After completing your final design work, do the following:
1) Use the “File > Package” command to let Photoshop generate a simplified, professional project package for you. That folder should have the following structure:
- (folder) yourlastname-p1 Folder”
- (folder) “Links”
- (folder) “yourlastname-p1-assets”
- (file) “yourlastname-p1.psd”
2) Generate a full-sized 1280px presentation mockup file of your final PSD as shown in the final video demo, naming the 1280 artboard export “yourlastname-p1-MOCKUP-1280.jpg” and the 600 artboard export “yourlastname-p1-MOCKUP-600.jpg“. Save those files inside of your packaged folder before turning in.
3) Zip your packaged folder.
4) Upload the final zipped package to your student directory on the MAT server. Here’s what you need to do that:
- MAT Server Logon Information
- free SFTP software
- Cyberduck for Windows (free SFTP software)
- Cyberduck for Mac (free SFTP software)
- Tutorial to connect to the MAT server:
Due at the Critique
- Upload the following to the server in your student directory (see Canvas for server connecting info):
- lastname_p1 Folder.zip (see required sub-contents above in Technical Requirements)
- Post your ‘yourlastname-p1-MOCKUP-1280.jpg’ and ‘yourlastname-p1-MOCKUP-600.jpg’ to the assignment’s discussion forum in Canvas, along with your artist statement.
Concept and Content Requirements
Concept:
Create a 1280px and 600px responsive-view web mockups with original branding, color scheme, image resources, and relevant text where necessary.
- Understand and be able to execute processes necessary to generate the following optimized web images:
- jpg flat mockup at full scale (1280px wide)
- jpg flat mockup with suitable content reflow for mobile (600px wide)
- folder of image assets that are part of a larger “package” folder.
Content:
Follow all content customizations in the “Process > Part Six” notes up above to meet content requirements.
Technical Requirements
You are required to use the following settings/tool/techniques to get full credit for the assignment:
Technical Setup:
…Mode: RGB, …Width dimension: 1280px x necessary height, …Image resolution: 72 ppi, In the last stage of the tutorials you will learn how to create artboards for multiple layouts accommodating an additional 600px wide layout as well…. Resulting zipped package file with additional full flat mockup jpg:
- (folder) “yourlastname-p1 Folder”
- (folder) “Links”
- (folder) “yourlastname-p1-assets”
- (file) yourlastname-p1.psd
- (file) yourlastname-p1-MOCKUP-1280.jpg
- (file) yourlastname-p1-MOCKUP-600.jpg
Vector Shapes, Conversions, Clipping Paths, and Transformations: Use vector shapes in a variety of ways, including converting type to vectors, using to create visual shapes, applying to clipping paths, and transforming (scale, rotations, etc.).
Path Selection and Direct Selection tools: Use Path Selection and Direct Selection tools to manipulate vector shapes (moving and transforming).
Pen tool: Use Pen tool to modify vector shapes.
Smart objects: Use at a minimum of 12 smart objects in your final PSD.
Create web document grid system with guide plugin tool: Apply a web grid system based on a 1280px width and use the GuideGuide extension to generate the guides for columns, gutters, and margins.
Layers and Layer Groups: Clearly organize, group, color-code, and label your layers within the final PSD.
Adobe Bridge and Adobe Camera RAW (ACR): Use the Bridge viewer to browse files and launch images in Camera Raw for processing. Process all final Smart Object image resource files in Camera Raw to correct and/or adjust colors and effects.
Adjustment Layers: Use at least 2 non-destructive layer adjustments to adjust color or tonal range.
Layer Styles and Filters: Use at least two layer styles on layers and apply at least 2 Layer filters to adjust images.
Save for Web: Use Save for web at least once to create a flat web presentation mockup jpg.
Generate Web Assets: Reorganize and rename your layers as necessary to automatically generate web assets from your PSD file using the “File > Generate” command.
Artboards: Learn to use Photoshop’s artboards to create two layouts (1280px and 600px wide).
Create Photoshop ‘Package’: Use the “File > Package” command to properly generate a folder to turn into the instructor.
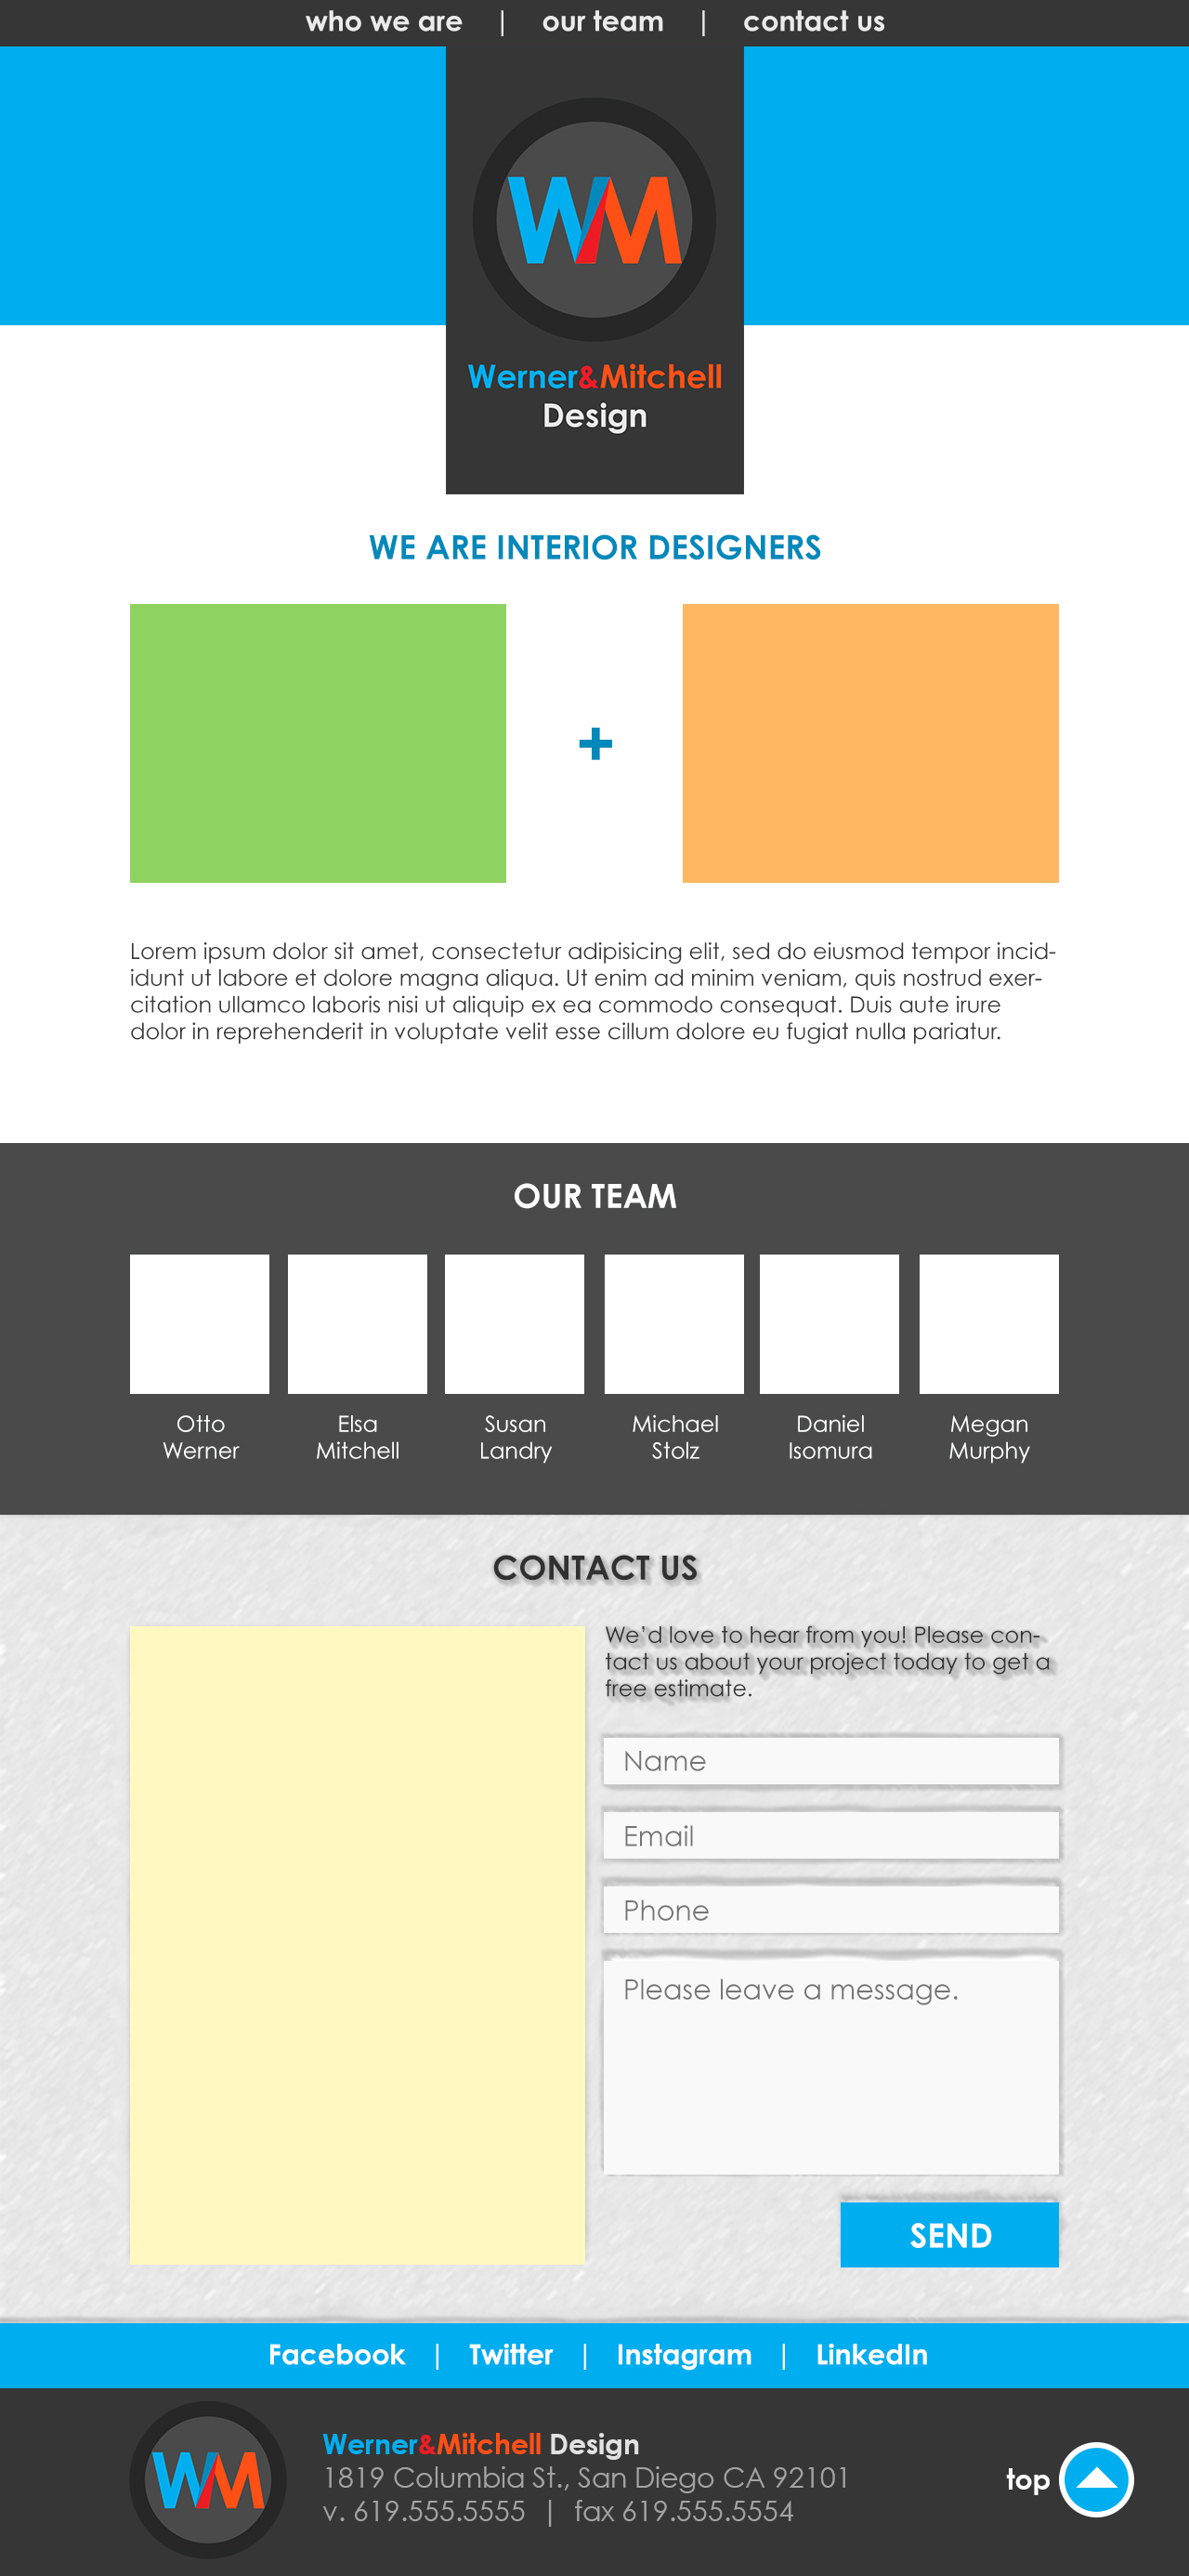
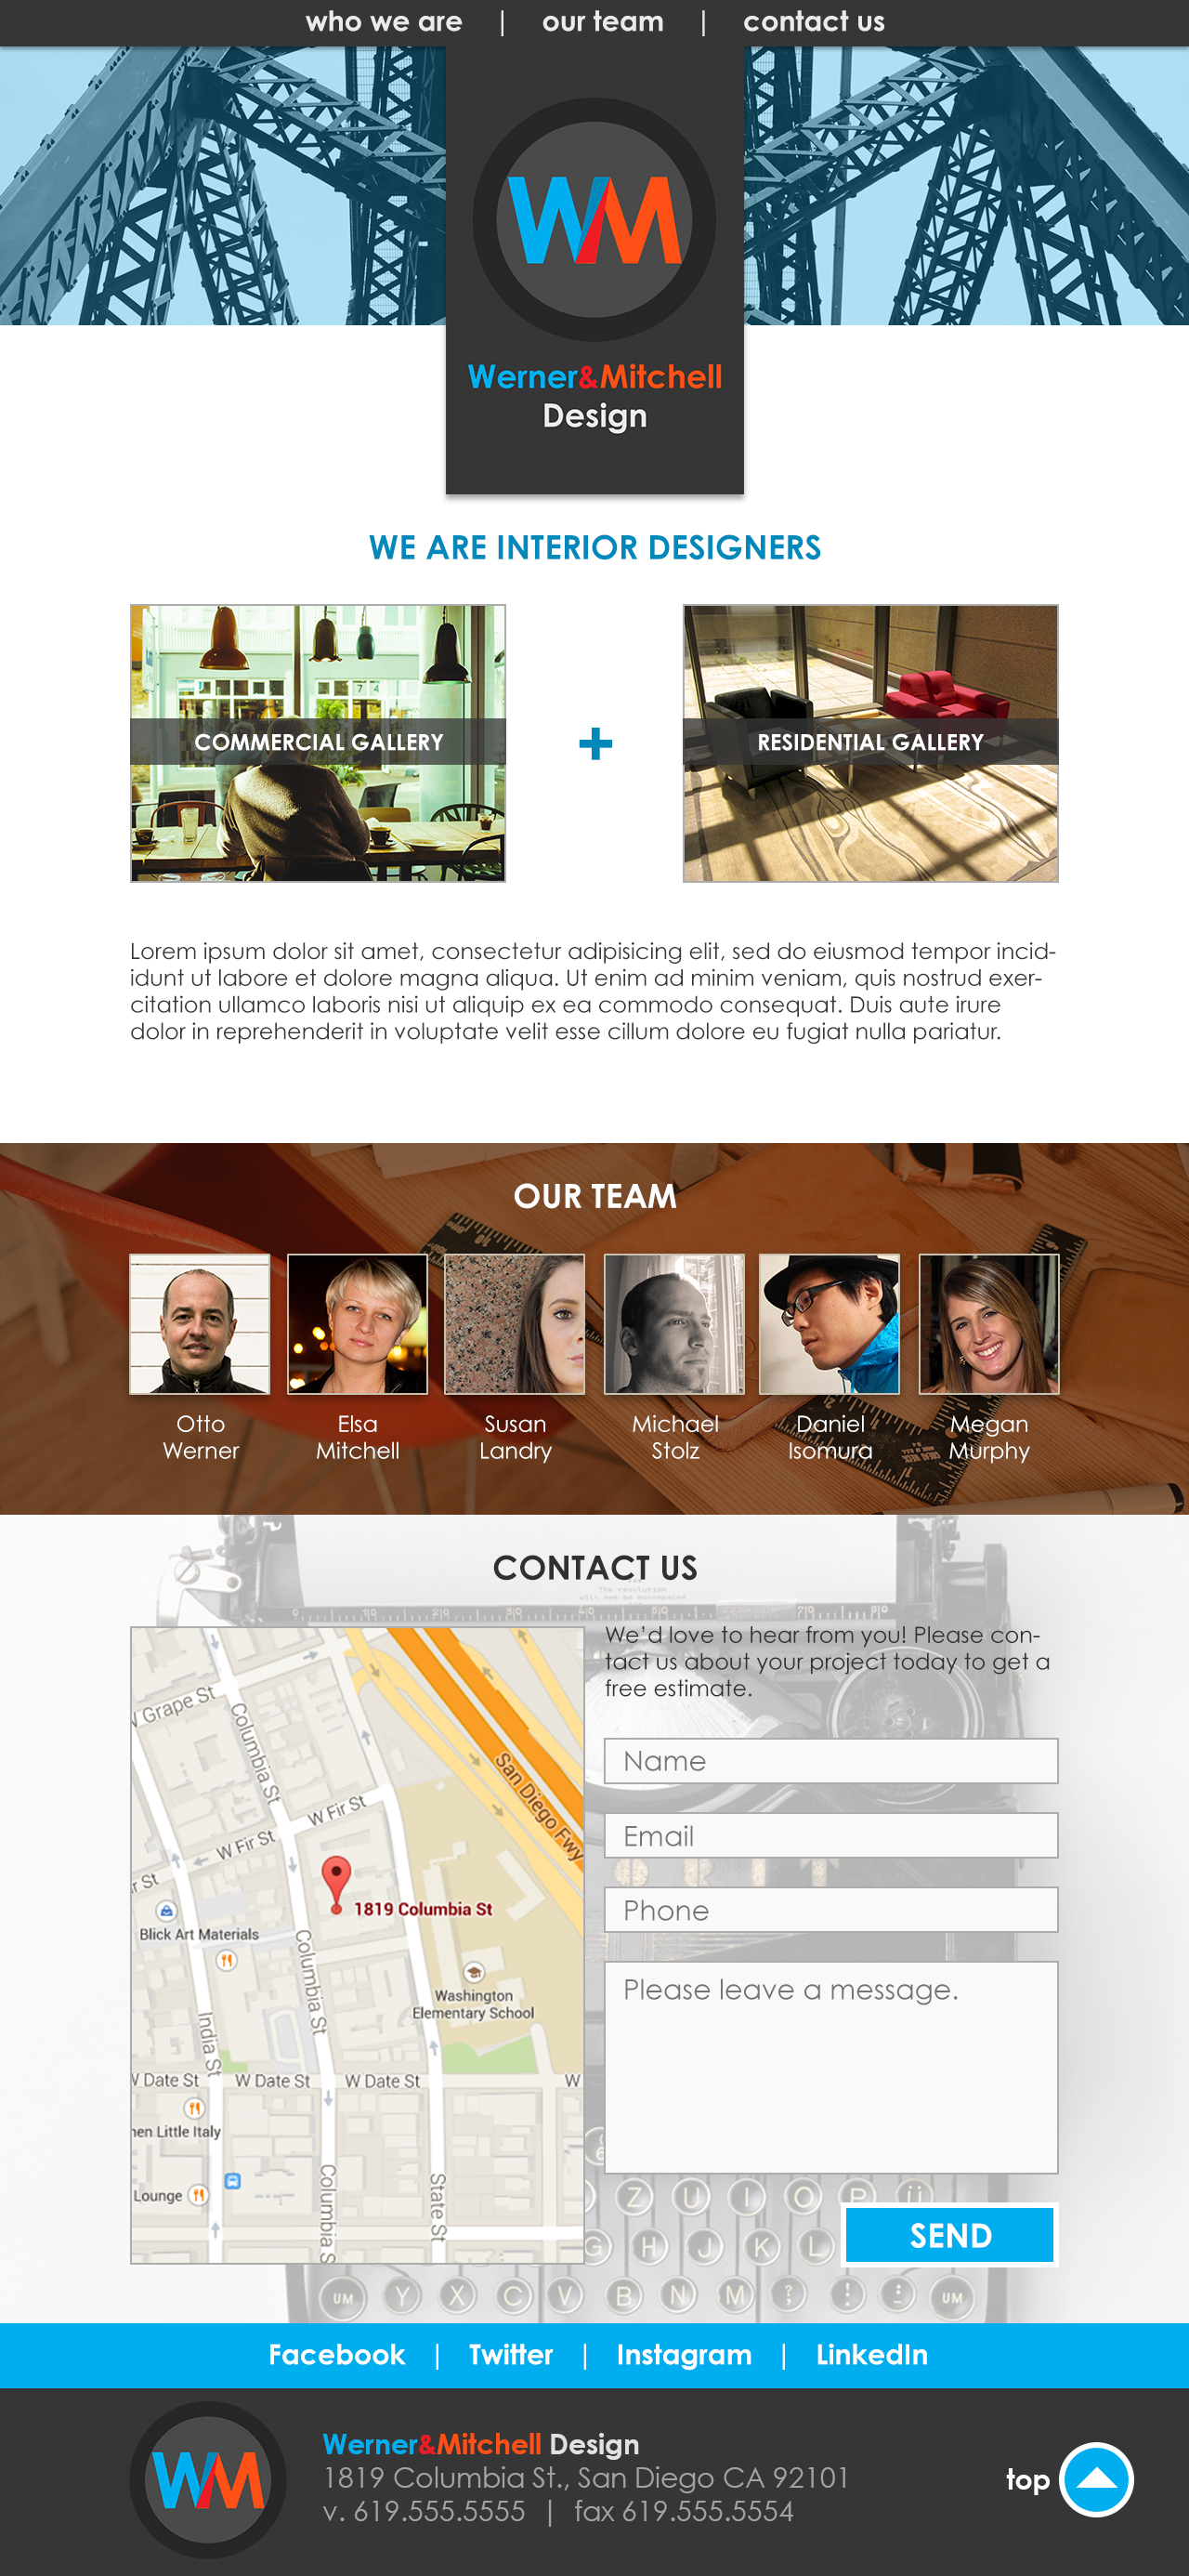
Example Work
The following images are examples of different stages of the process and are only intended to give you a sense of what the different phases of the assignment are. Be sure that your final work is NOT identical to this.
Click on the following thumbnails to view larger images:


Student Work Examples:
Please click on individual images to see them larger.


